I found some seriously chic curb appeal by turning forgotten thrift-store treasures into conversation-starting planters. No green thumb required, just a little imagination—and yes, you can totally DIY these on a weekend. Let’s dive into easy, budget-friendly ideas that wow without the effort.
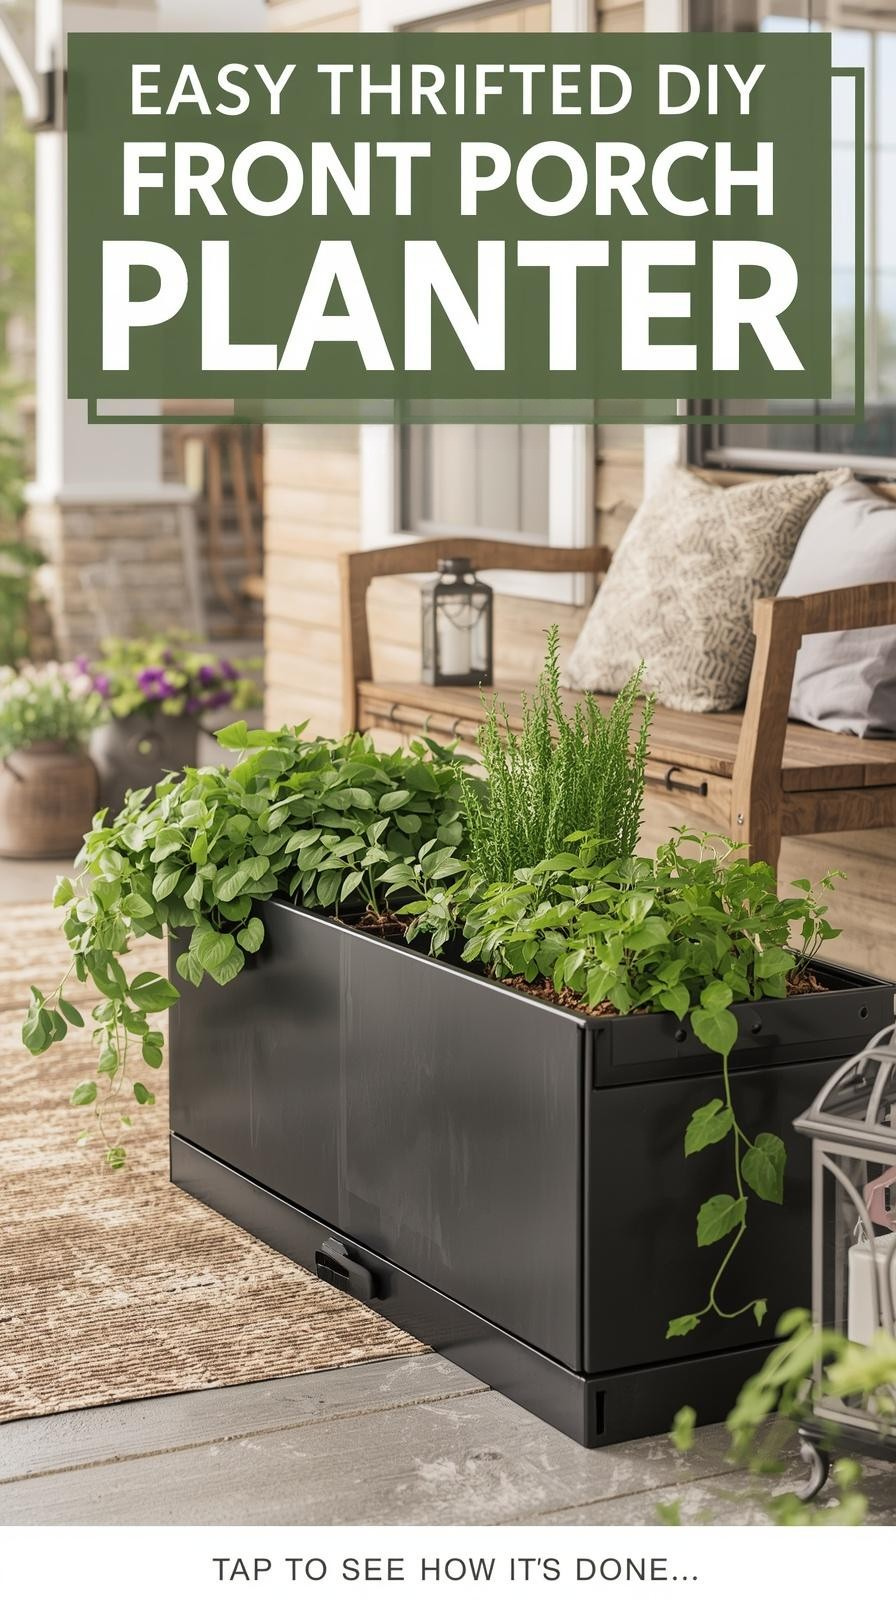
1) Convert a Filing Cabinet into a Modern Front Porch Floral Cabinet
Turned junk into centerpiece-worthy decor—that’s the vibe. The trick is rethinking the cabinet as a planter base rather than storage.
– Source a cheap filing cabinet (Facebook Marketplace rocks for this).
– Remove the drawers and lay the piece on its side to create a rectangular planter footprint.
– Create a bottom insert from plywood, seal edges with construction adhesive, and clamp until secure.
– Add a rubber doormat or stair tread around the back to boost texture and stability.
– Paint with flat black rust paint for a matte, modern finish. Two coats, with a quick scuff in between, keep it smooth.
– Fill with lightweight materials like cardboard recycling to save soil and weight, then nestle faux or real plants and soil on top.
– Optional antique look: rub a bit of silver wax on the lattice textures to give that aged metal vibe.
Why it works: you get a tall, eye-catching, weatherproof planter without shelling out big bucks. Plus, the thrift-to-gallery transition is incredibly satisfying.
2) Turn a Trash Can into a Lattice-Front Planter
This one is so clever you’ll wonder why you didn’t think of it first.
– Grab a large trash can and a rubber doormat with a lattice pattern (or a stair tread for a similar effect).
– Coat the back of the mat or tread with a strong adhesive and wrap it around the trash can. Let it cure for about 24 hours with clamps or twine to hold everything steady.
– Once dry, seal the look with a metal-friendly wax (optional) to antique the lattice and add character.
– Add drainage holes in the top if you plan to plant real soil and plants.
– Top with soil and your favorite plants, then arrange faux or real greenery in the can.
Tips: color-match the adhesive to the container so the seams disappear. The result: a ceramic-looking planter that’s actually upcycled metal.
3) Create a Mosaic Pipe Planter for Narrow Spaces
If you’ve got a little extra space by a pool or a bare corner, mosaic pipes bring color and personality without breaking the bank.
– Cut a 5-foot PVC pipe into two pieces, then add a bottom end cap for stability.
– Sand the exterior with heavy-grit sandpaper and wipe clean.
– Wrap a chicken wire base around the pipe and secure with duct tape for structure.
– Apply mastic (tile adhesive) to the pipe and press in a mix of glass gems, broken tiles, and plate shards. Press firmly for good adhesion.
– Once dry, grout the seams, wipe away the excess with a sponge, and seal the surface after it cures.
– Add weight by dropping large rocks into the pipe for stability.
– Use these mosaics as vertical statement pieces near the porch or around the pool.
Why it’s cool: you can customize colors and textures, and the vertical height elevates your plants above eye level for a better curb view.
4) Simple Steps to Prep Any Thrifted Planter for Outdoors
No matter which project you choose, a few prep steps keep things looking fresh longer.
– Clean then sand rough edges if needed, especially with metal pieces.
– Prime if the surface is bare metal or rusty; you’ll get a smoother paint job and longer wear.
– Drill drainage holes for real soil, or use a lightweight substitute to avoid root rot and soggy soil.
– Use weatherproof sealants or waxes on external surfaces for moisture resistance.
– Consider lightweight soil mixes that cover needs without weighing down the base.
Bonus: plan your weight distribution. For tall pieces, fill with leaves or lightweight filler to cut down on soil weight and still keep a realistic look.
5) Real vs. Faux Plants: How to Choose
Decisions, decisions. Real plants look lush but require water and care; faux plants stay perfect with almost zero maintenance.
– Real plants: Pansies, succulents, or small perennials work well in shallow planters. They give immediate color and a lived-in feel.
– Faux plants: High-quality faux options fool most visitors, especially in high-traffic areas where you don’t want regular watering or replacement.
– Mix it up: Use real plants in the bottom layer with faux plants tucked in for fillers and constant color. It keeps your planters looking full year-round.
FYI: If you decide to go faux, choose varieties with natural stems and textured leaves to keep things believable.
DIY Style Notes
– Add a weatherproof sealant to protect paint and finishes from sun and rain.
– Use a matte or satin finish for a modern vibe; gloss can feel a touch showroom-y.
– Personalize with small decorative touches—think a tiny brass plaque, a seasonal ribbon, or a simple tag with your house number.
6) Budget and Sourcing Magic
Here’s how to keep costs low and creativity high.
– Hunt on Facebook Marketplace, thrift stores, and curbside freebie spots for interesting bases like filing cabinets, metal drums, or vintage taps.
– Reuse cardboard and old leaves to minimize soil needs while keeping weight down.
– Don’t worry about perfection—rust, patina, and imperfections add character and charm.
– If you’re repainting metal, use rust-resistant paints and two even coats with time to dry in between.
7) Safety and Maintenance Tips
A quick reminder to keep things easy and safe.
– Ensure drainage is functional for real soil planters to avoid root rot.
– Check the stability of taller units; add weight or wall anchors if necessary.
– Use weather-appropriate products (waterproof sealants, rust inhibitors) so your planters survive seasonal changes.
– Clean occasionally to prevent mold or algae buildup, especially on porous surfaces.
Deeper Dive: Drainage and Weight Management
– Drilled holes plus stone or fabric liner can help water flow while keeping soil from washing out.
– Bags of pea gravel or lightweight fill keep heavy planters grounded without making them a nightmare to move.
– For large or very tall pieces, consider attaching a small, discreet anchor to the porch floor or wall to reduce tipping risk.
Frequently Asked Questions
Can I reuse a filing cabinet that’s rusty or damaged?
Yes. A rusty cabinet can become a stunning, industrial-chic planter with a good rust-resistant paint job and proper sealing. Two coats with a light scuff between keep the finish durable, and you’ll be amazed at the finish.
Do I need to drill drainage holes for real soil?
Absolutely. Real soil needs drainage to prevent waterlogging and root rot. If you’re using faux plants, you can skip it, but most real-soil setups benefit from drainage holes.
What if I don’t have a big budget?
You’re in luck. The whole concept is thrift-friendly: thrift-store bases, repurposed mats, reclaimed tiles, and a little DIY love go a long way. The goal is to use what you have around the house or grab inexpensive pieces from secondhand sources.
Are these planters weatherproof?
With the right finish and sealant, yes. Use rust-resistant paints for metal, weatherproof sealants for coatings, and proper drainage to ensure longevity in sun and rain.
How do I choose between real and faux plants?
If you want year-round color with minimal upkeep, go faux. If you enjoy seasonal changes and a living display, go real and pick hearty, sun-loving plants like pansies or small perennials that fit your planter size.
Conclusion
Turn thrift finds into curb-appeal heroes with a dash of imagination and a sprinkle of DIY magic. Whether you repurpose a filing cabinet into a sleek planter, wrap a trash can in a lattice mat for a ceramic look, or craft a mosaic pipe feature, these ideas prove you don’t need to break the bank to boost your front porch’s charm. So grab your tools, check your local thrifts, and start building something your neighbors will compliment—and perhaps envy. Happy planting!
This post may include affiliate links. Some are Amazon: As an Amazon Associate, I earn from qualifying purchases. See affiliate disclosure.