Looking to turn a chaotic closet into a stylish, insanely practical butler’s pantry? You’re in the right place. Let’s ditch clutter, unleash clever storage, and make your space look seriously cute while you’re at it. FYI, this isn’t just a swap of shelves—it’s a full-on vibe upgrade.
Clear It All: The First Step to Smart Storage
– Start by emptying the entire closet. Yes, every box, decor piece, and random seasonal item.
– With nothing left, you instantly see what you actually have and what you can reclaim as usable space.
– This is the moment to decide what belongs in the closet versus what should stay in the kitchen or elsewhere.
If you’re feeling overwhelmed, remember: momentum beats analysis paralysis. Clear it out, then reassess what truly needs a home in your new setup.
Plan and Measure: What Your Closet Needs to Become a Pantry
– Measure the width of your shelves. Those measurements drive every choice you’ll make next.
– Scout the bath or hardware sections at a big-box store for affordable, sturdy options. The video creator used towel bars—three short pieces and three wider ones—finished in gold for a chic touch.
– Keep track of hardware. You’ll use most pieces, but you won’t need the screw anchors.
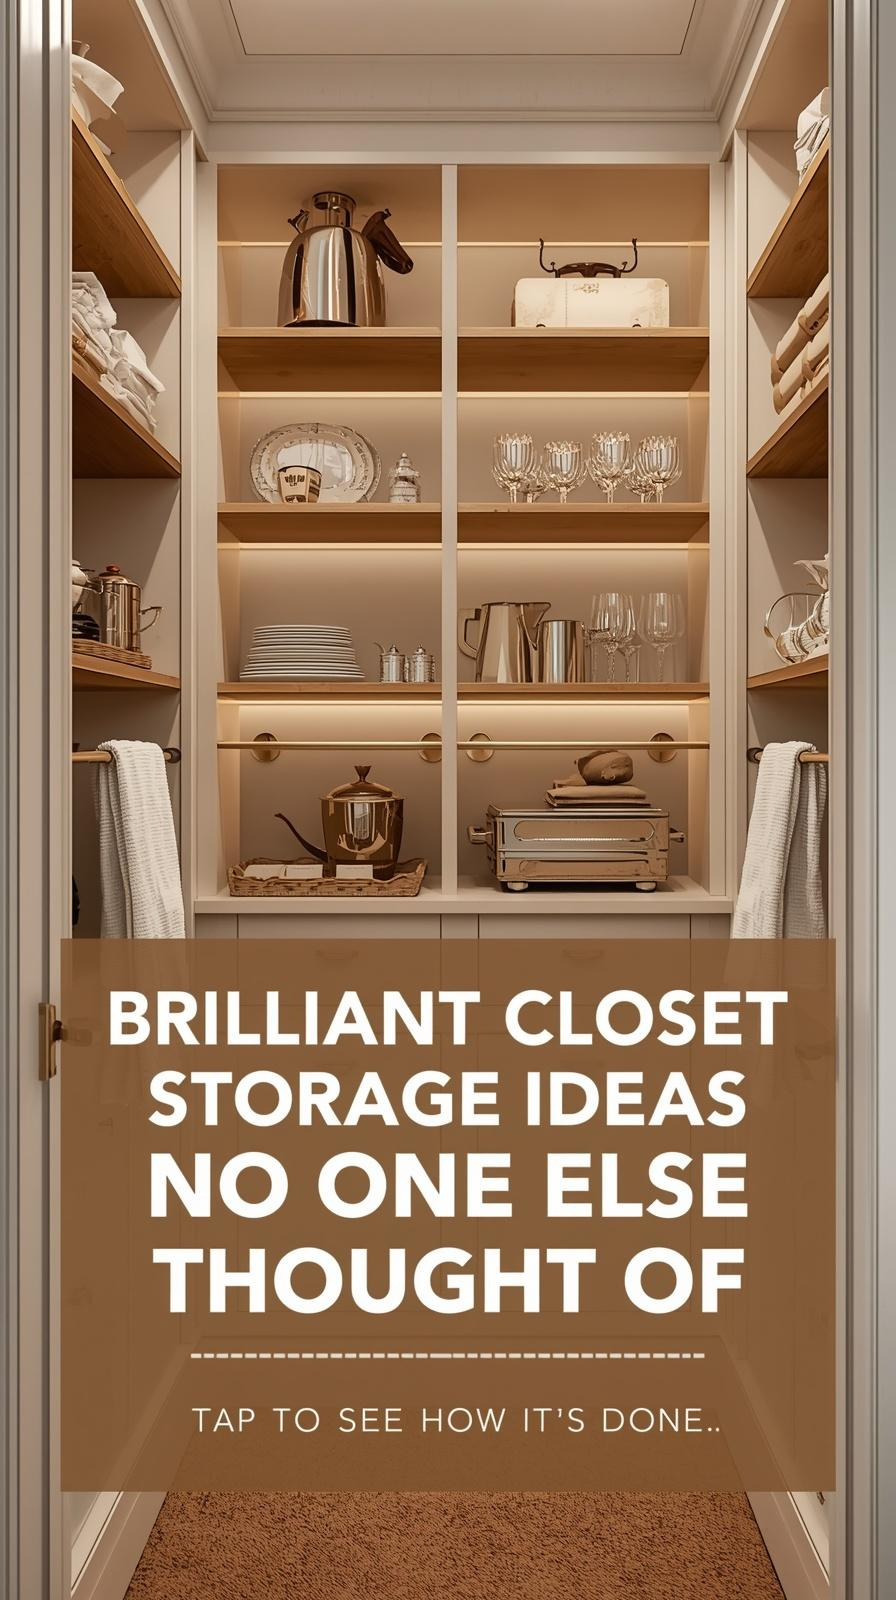
Why towel bars? They’re versatile. Attach them to shelf edges so bars face upward, creating rail-like dividers that look elegant and keep items from tipping over.
Install Railings: The Secret Sauce for a Pretty, Practical Pantry
– Attach the towel bars to the edges of shelves, facing upward. Secure them with the small pins using an Allen wrench.
– Install as many as you want on different shelves to create a secure, “railings” aesthetic.
– Once everything is back in place, you’ll be amazed at how photogenic and sturdy the space becomes.
What’s the payoff? A visually appealing setup where dinnerware, trays, and fragile vases stay safe and organized behind rails, with stemware easy to reach.
Smart Organization Ideas You Can Actually Use
– Use railings as a display and storage system: place trays behind the rails, store cake stands (when not in daily rotation) in an attractive, accessible way.
– Turn the closet into a mini curated showroom for niche items you want to keep handy but tidy.
Pro tip: A neat, themed display makes you more likely to actually use what you store rather than letting it sit in dust.
Quick Kitchen Hacks That Make Life Easier
Reimagining Spice and Herb Storage
– Use two cake pans and a handful of marbles to create a simple, color-coded, spin-ready spice organizer. It slides into a cabinet and keeps everything visible and reachable.
Under-Sink Realignments
– Install a curtain rod and tailor it to fit around the trash bag area. This creates a clean, accessible storage solution that reduces mess and makes bag changes a breeze.
Magnetic Knife Holder on Oak Tooling
– Build a slim oak strip with magnets set into it. Glue on a second strip to clamp the magnets securely. Wall-mount this magnet-backed knife rack for a sleek, invisible look. It’s a subtle upgrade that preserves knife edges.
Door-Hung Snack Storage
– Use a shoe hanger on the pantry or cabinet door with a few hooks. It turns door space into easy-to-reach snack storage. Simple and brilliant—AKA the “duh, why didn’t I think of that?” moment.
DIY Knife Block Upgrade
– Create a handmade box from scrap cedar, glue it, and nail the bottom in place. Sand, stain if you want, and display as a decorative yet functional piece. Add skewers to hold knives—your edge stays sharp because the knives aren’t scraping wood.
Building a Custom Pantry Wall: Beams, Beadboard, and Bars
– If your cabinets overflow, craft a dedicated wall shelf system. Start with scrap cedar boards (roughly 5 inches wide) for the frame and beadboard backing for wipe-clean surfaces.
– Add metal rods with a black finish for a modern contrast. Use a router to craft clean edges, then finish with polycrylic for durability.
– Mount with stud-anchored screws for safety and sturdiness.
This DIY pantry wall isn’t just storage; it’s a design statement that makes everyday staples feel special.
Putting It All Together: Style Meets Function
– Rehome pantry staples into clear jars to maintain visibility and reduce the “out of sight, out of mind” problem.
– Mount everything securely to wall studs to prevent wobble and ensure long-term sturdiness.
– Embrace a cohesive color palette (like gold rails with white backings) to create a polished, magazine-worthy look.
The payoff is practical beauty: a space that feels like a boutique kitchen extension rather than a cluttered closet.
FAQ
Is this project expensive to replicate?
– Not at all. You can source affordable towel bars and hardware from big-box stores, and many of the materials are repurposed or inexpensive basics. The magic comes from the layout, not the price tag.
Do I need to be a DIY expert to pull this off?
– Nope. The core steps are straightforward: clear out, measure, install simple rails, and organize. Basic tools like a drill, level, and clamp set suffice. If you can assemble furniture, you can tackle this.
What’s the best way to decide what goes where?
– Start with heavy items that need extra protection (fine china, breakables) and place them behind the railings. Lightweight, frequently used items (seasonings, snacks) go on the lower, easy-to-reach shelves.
How do I maintain the look long-term?
– Regularly declutter and re-evaluate what belongs in the closet versus the kitchen. Use clear jars for visibility, wipeable backing for easy cleaning, and ensure you re-seat hardware if it loosens.
Can I customize this for a smaller space?
– Absolutely. You can scale the number of railings up or down and choose shorter or narrower towel bars to fit your shelves. The concept stays the same: create secure rails to tame the chaos.
Conclusion
Turning a chaotic closet into a charming butler’s pantry is less about fancy gadgets and more about smart layouts, sturdy rails, and a touch of personal style. Clear it out, measure, mount rails, and fill the space with a curated mix of practical items and pretty displays. Before you know it, you’ll walk into your hall closet and think, wow, this is actually a pantry I’m proud to use.
If you’re craving more simple, fun storage hacks that blend function with personality, this approach proves you don’t need a full-scale renovation to get a big impact. Try one or two tweaks first, then expand as you fall in love with the process. Happy organizing, friend—your new, charming butler’s pantry awaits.
This post may include affiliate links. Some are Amazon: As an Amazon Associate, I earn from qualifying purchases. See affiliate disclosure.