If your kitchen cabinets are bursting at the seams, you’re about to see how a few clever hacks can triple your storage without a full remodel. From space-saving shelves beside the fridge to mug racks that actually look cool, these ideas come straight from real-life trial and error—and they work.
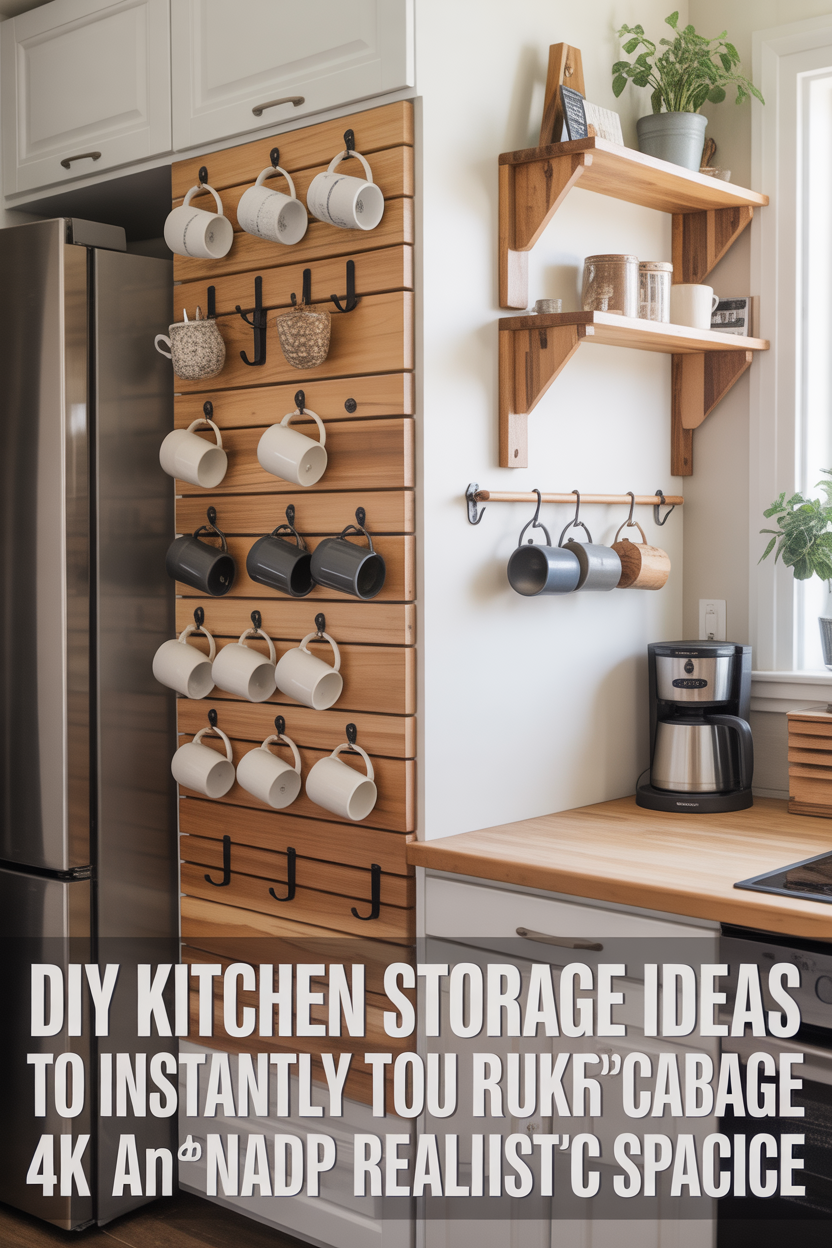
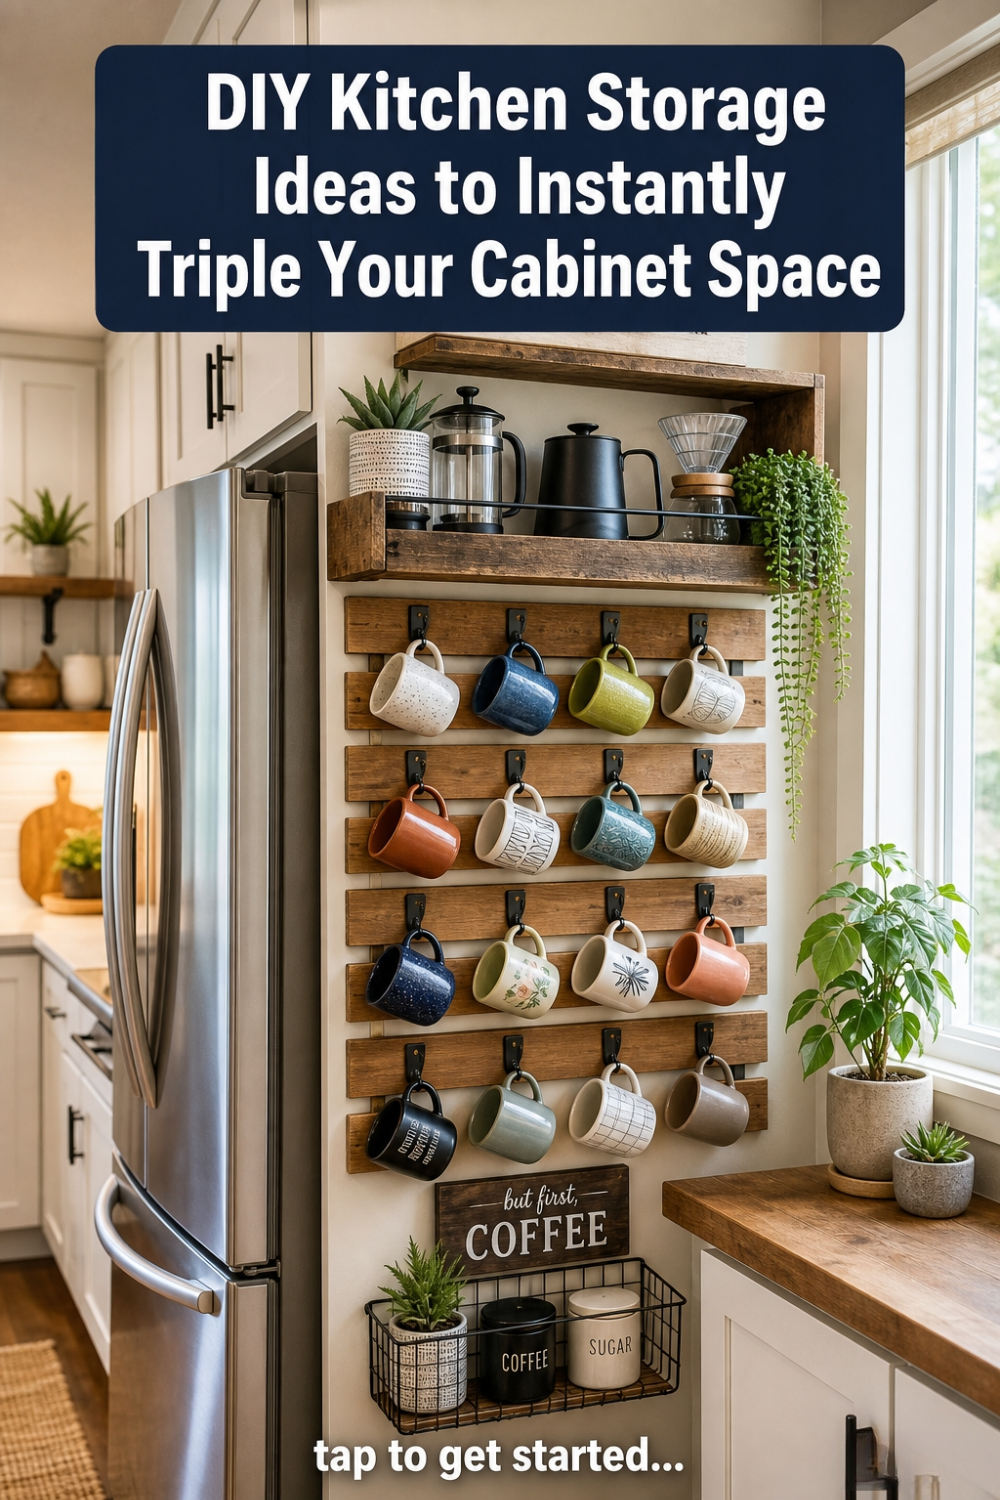
1) Convert Empty Fridge-Side Space into a Custom Mug and Coffee Station
Tickle your inner tinker by measuring the gap beside your fridge, then sketching a plan before you cut a single piece of wood. The trick is lightweight cedar strips that form a slatted rack. Stain them to match your cabinets, but keep the frame sturdy with screws (or a nail gun if you’re feeling fancy).
– Build a simple frame first, pre-drill holes, and use copper-toned screws for a clean look.
– Lay out the slats on top of the frame and attach them for a breathable, modern vibe.
– Add heavy-duty Velcro along the top, middle, and bottom so you can remove the rack if you ever want a renter-friendly solution.
– Mount two rows of hooks (I like dollar-store hooks spray-painted black) to hold mugs, pods, and utensils.
Why it works: it creates instant vertical storage while keeping the cabinet sides untouched. It also offers a flexible, removable setup if your kitchen layout changes.
2) Use Reclaimed Wood and Simple Railings for a Rustic, Functional Shelf
If you’ve got scrap boards lying around, you can build a compact wall-mounted rack that doubles as a coffee-themed display. Here’s the gist:
– Cut three boards to the same length and add lightweight cedar strips across the top and bottom for structural support.
– Pre-drill and screw the cedar strips to reinforce the frame. A couple of brad nails hold everything in place.
– Add a middle railing (even if you have to use pine instead of oak) to create a strong, shelf-like look.
Finishing details matter:
– Pre-stain wood conditioner on pine to avoid blotchy staining.
– Stain to a maple-like color to blend with warm cabinet tones.
– Finish with affordable, quick-dry hardware to keep the project moving.
This concept is versatile: swap in a stencil theme for a coffee vibe or switch to a different motif to suit your space. It’s not just pretty—it’s practical for mugs, small gadgets, or even plants.
3) Create a Budget-Friendly Wall-Mounted Mug Rack with Paint and Hooks
If you want a quick, inexpensive upgrade, dollar-store hooks and reclaimed boards create a standout mug rack that feels built-in. Here’s the flow:
– Assemble three boards with cedar strips as cross-supports; paint or stain to taste.
– Choose a stencil theme (for this project, a coffee motif works beautifully) and lay it out on the boards for pattern inspiration.
– Paint the hooks in a durable black finish so they pop against the wood.
– Attach the rack to the wall with a level to ensure a clean, straight install.
Tip: test-hang a mug before you secure the hooks to confirm spacing. The result looks like a storefront display but is totally home-made and flexible.
4) The Mop-Rack Hack: Quick, Cheap, Ultra-Effective
This one’s got DIY genius written all over it. If your cupboards feel stuffed, turn to a mop rack upgrade that actually holds more than mops.
– Use three mop racks and remove extra handles—only keep the handles you need.
– Cut the metal handles to the right length with a metal blade, then paint them black for a cohesive look.
– Mount the racks with two vertical supports per rack, using zip ties to secure everything. This keeps the weight distributed and the setup stable.
– Leave screws protruding slightly so you can slide the handles on, creating a simple, friction-based system that’s easy to take apart.
Decorate with plates, mugs, or greenery to give the whole wall a kitchen-y vibe. FYI, this setup is incredibly versatile: garden tools, art supplies, or pots and pans could all find a neat home here.
5) Finishing Touches: Color, Texture, and Accessibility
Regardless of the exact setup you choose, finishing touches will elevate the project from “pretty hack” to “practical upgrade.”
– Color match: choose stains that harmonize with your cabinets. A maple-like stain on pine can blend beautifully with warm-toned woods.
– Hardware: go for non-permanent options where possible (like command strips) for rental-friendly changes.
– Placement: use a level to ensure the top and sides are perfectly straight. Even a small tilt can throw off the look and function.
The big idea: think in layers. A frame, a set of slats, and a row of hooks create depth and stability, while removable fasteners keep the makeover flexible.
6) Practical Tips for a Smooth Build
– Pre-drill everywhere: reducing wood splitting and making screw insertion painless.
– Use proper fasteners: screws for strength, nails for quick assembly, and zip ties for unconventional mounting on the mop-rack hack.
– Test fit before final assembly: dry-fit the framework to ensure it fits perfectly in your space.
– Slow and steady staining: brushed on, wipe off, and let dry overnight to avoid blotchy results.
– Build modular where possible: if you’re renting or planning to move soon, modular pieces are much easier to disassemble and reassemble.
7) Quick Pros and Cons at a Glance
– Pros: Big gains in usable space, customizable to your exact kitchen layout, affordable materials, and a DIY-friendly process.
– Cons: Requires a little time and basic tools, and you’ll want to measure carefully to avoid mismatches.
Because this is about your kitchen, you want it to feel personal. These setups let you choose color, finish, and hardware that actually match your style.
FAQ
How do I measure the space accurately for the mug rack?
Take width and height measurements of the available space beside the fridge, then sketch a plan to scale. This helps you know exactly how much wood you’ll need and where to place each element, including hooks and rails.
What finishes work best for pine versus oak?
Pine is a softwood and tends to blotch if stained untreated. Use a pre-stain wood conditioner on pine to even out the color, then apply your stain. Oak is a hardwood and usually stains more predictably, but you can still use conditioner if you want a consistent finish across different woods in your project.
Are command strips reliable for mounting racks on cabinets?
Command strips are a non-permanent, renter-friendly option. They’re best for lighter racks or components, but for more robust attachments (like a full mug rack with multiple hooks), combine them with screws or brackets to ensure stability.
Can these ideas be adapted for non-kitchen spaces?
Absolutely. The same concepts work for garages, laundry rooms, or craft areas. Use the same frame-and-slats approach, but tailor the finish and hardware to the space’s vibe.
What if I don’t have many tools?
You can still pull this off with basic tools and some clever shortcuts: use pre-cut boards from the hardware store, a simple drill, a saw or even a box of ready-made shelves you customize with stain and hooks. The core ideas are adaptable to your tool arsenal.
Conclusion
If you’ve been dreaming of a kitchen that actually holds all your stuff without looking chaotic, you’re in luck. With a handful of affordable materials, some smart cutting and staining, and a dash of patience, you can triple your cabinet space—and your kitchen vibe. These DIY storage ideas prove you don’t need a full gut job to get a big payoff. So grab that tape measure, pick a project, and start transforming clutter into clever, stylish storage you’ll actually use.