You adore fabric. The textures, the patterns, the sheer potential of a beautiful bolt of cloth just sitting there, waiting for a project. But your sewing machine? It’s probably gathering dust in a corner, giving you the side-eye. Or maybe you don’t even *have* one, and the thought of threading a needle makes you break into a cold sweat. Good news, fellow fabric enthusiast! Easter is upon us, and you can absolutely dive into some gorgeous fabric crafts without a single stitch. Ditch the machine, grab your glue gun, and let’s get crafty.
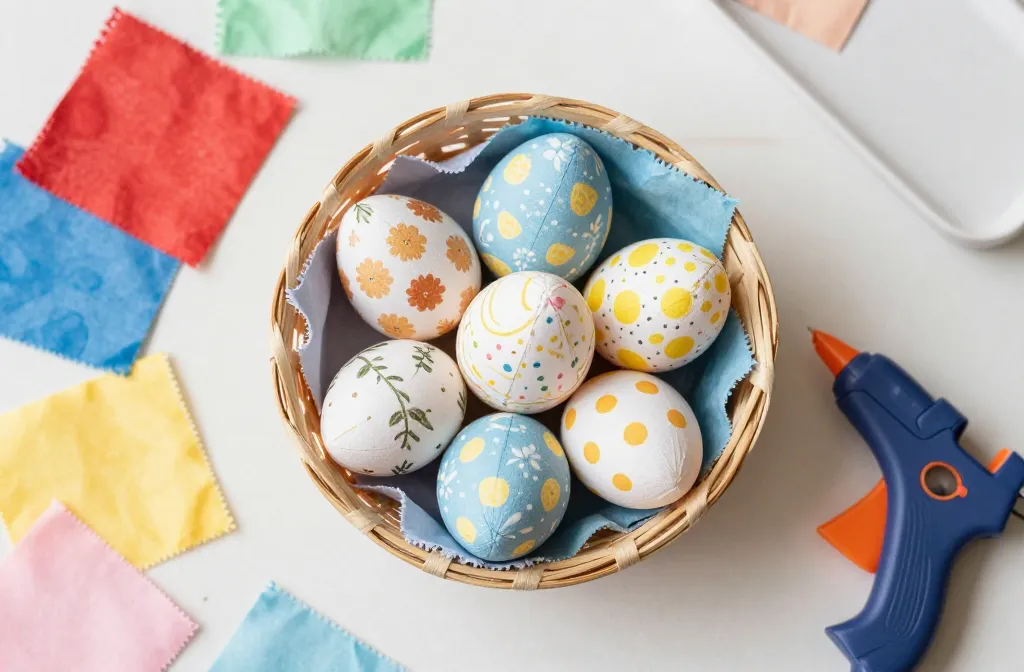
Fabulous Fabric-Wrapped Eggs
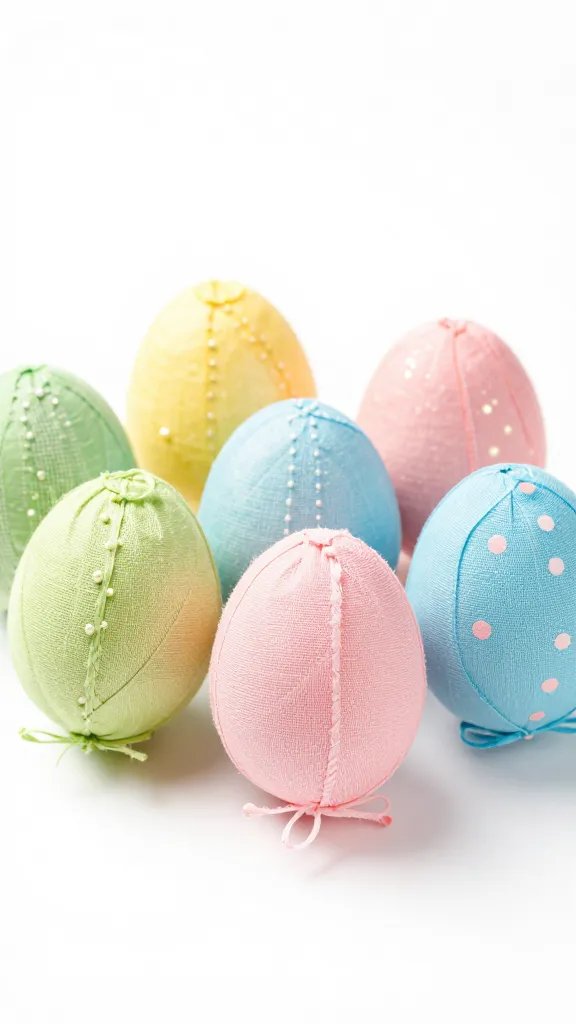
Forget those messy dye kits that stain your fingers for days. We’re elevating our Easter egg game with fabric, and trust me, it’s a game-changer. These look incredibly chic and are surprisingly simple to make.
Why This Rocks
Imagine a basket full of beautifully patterned eggs, each one a tiny work of art. These aren’t just for decoration; they’re a fantastic way to use up those smaller fabric scraps you just can’t bear to throw away. Plus, no more trying to peel a dye-stained shell. Win-win, right?
Gather Your Goodies
* Plastic or wooden eggs: These are ideal because they last forever. If you want to use real eggs, hard-boil them first and handle them gently!
* Fabric scraps: Cotton, linen, or even thin upholstery fabric works great. Think small prints, florals, geometrics – whatever makes your heart sing.
* Fabric glue or Mod Podge: My personal preference is Mod Podge because it dries clear and gives a nice finish.
* Foam brush or paintbrush: For applying the glue.
* Scissors: Sharp ones are always a friend.
The “How-To” Hustle
This isn’t rocket science, but a little patience goes a long way.
1. Prep your fabric: Cut your fabric into small, irregular shapes. Think triangles, squares, or even strips. Don’t worry about perfection; the charm is in the patchwork!
2. Glue it down: Apply a thin layer of glue to a small section of your egg. Press a fabric piece onto the glue, smoothing out any wrinkles with your fingers or the brush.
3. Overlap and repeat: Continue gluing fabric pieces, slightly overlapping them to ensure no egg shows through. Keep rotating the egg as you go.
4. Seal the deal: Once the entire egg is covered and dry, apply a final thin coat of Mod Podge over the fabric. This seals it, gives it a slight sheen, and makes it more durable. Let it dry completely.
Plush No-Sew Fabric Carrots

Who doesn’t love a cute fabric carrot? These are perfect for tucking into Easter baskets, stringing into a garland, or just scattering around for a festive touch. And honestly, they’re so much fun to make.
Why We’re Obsessed
They’re squishy, adorable, and you can make them in any size. Plus, they’re a brilliant way to use up those slightly larger fabric scraps that aren’t quite big enough for a full project but too good to toss.
What You’ll Need
* Orange fabric: Cotton or felt works best. Think solid orange, small orange patterns, or even a subtle texture.
* Green felt or fabric scraps: For the leafy tops.
* Hot glue gun and glue sticks: Your best friend for this project.
* Stuffing: Polyester fiberfill is perfect.
* Scissors: Again, sharp is good.
* Pencil or marker: For tracing.
Carrot Construction Zone
Get ready to channel your inner bunny!
1. Cut your carrot shape: On your orange fabric, draw a long, somewhat triangular shape with a rounded bottom. Think of a classic carrot silhouette. Cut it out. You’ll need two identical pieces per carrot.
2. Glue the edges: Place your two carrot pieces together, wrong sides facing. Run a thin bead of hot glue along the edges, leaving the wide top open. Press firmly to seal.
3. Stuff it up: Once the glue is dry, turn your fabric carrot right side out. Now, carefully stuff it with fiberfill. Don’t overstuff, but make it nice and plump.
4. Add the greens: Cut several thin strips or leaf shapes from your green felt. Gather them together and secure the bottom with a dab of hot glue.
5. Seal the top: Apply hot glue to the inside edge of your carrot opening. Insert the green “leaves” and press the fabric edges together to seal the carrot shut, securing the leaves in place. Fluff your leaves!
Whimsical No-Sew Bunny Ear Headbands
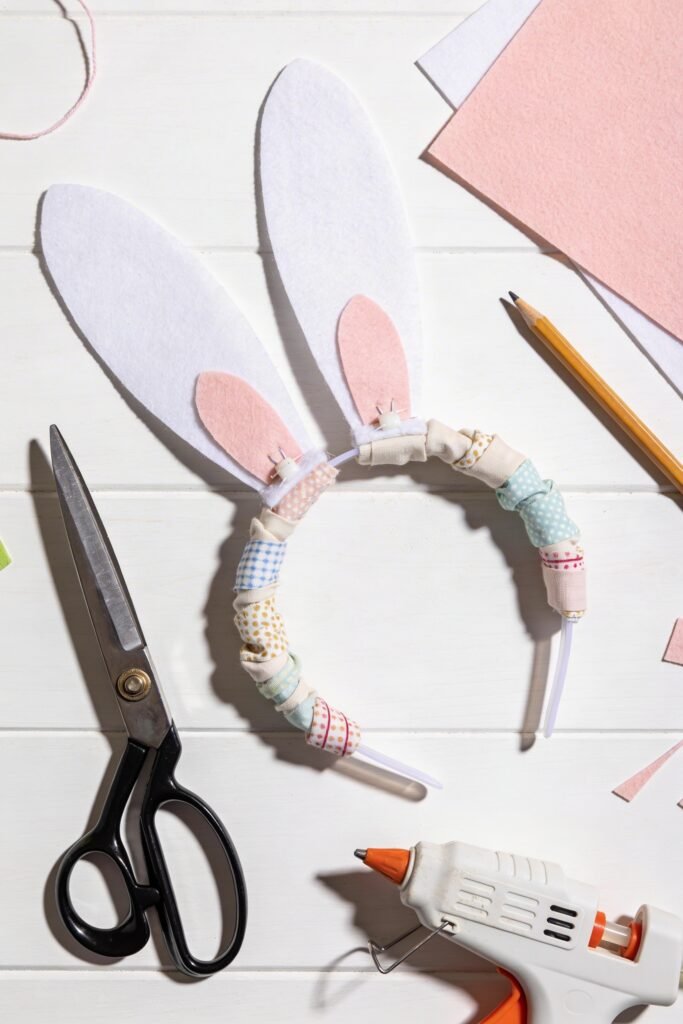
Want to add a touch of adorable to your Easter outfit without committing to a full costume? These headbands are your answer. They’re quick, customizable, and honestly, super cute.
The Cutest Accessory
Whether you’re making them for kids or for yourself (no judgment here, IMO!), these bunny ear headbands are a delightful accessory. They’re lightweight, comfortable, and you can match them to any outfit.
Supply Stash
* Plain plastic headband: The thinner, the better for comfort.
* Felt: White, pink, or any pastel color for the main ears and inner ear details.
* Fabric scraps: To wrap the headband and add flair to the ears (optional).
* Hot glue gun and glue sticks: Essential for assembly.
* Scissors: You know the drill.
* Pencil or marker: For tracing ear shapes.
Ear-resistible Steps
Let’s get those ears standing tall!
1. Trace and cut ears: On your felt, draw two large bunny ear shapes. Make them elongated and slightly rounded. Cut these out. Then, draw two smaller, slightly different colored inner ear shapes (e.g., pink on white) and cut those out.
2. Assemble the ears: Hot glue the smaller inner ear pieces onto the center of the larger ear pieces.
3. Wrap the headband (optional but recommended): If you want a fancier headband, cut a long strip of fabric, slightly wider than your headband. Apply hot glue to one end of the headband and start wrapping the fabric tightly around it, overlapping slightly, until the entire headband is covered. Secure the other end with glue.
4. Attach the ears: Find the desired placement for your ears on the headband (usually a few inches back from the center). Apply a generous amount of hot glue to the bottom edge of one ear and press it firmly onto the headband. Hold until secure. Repeat for the second ear. Make sure they’re evenly spaced!
Effortless Fabric Scrap Garland
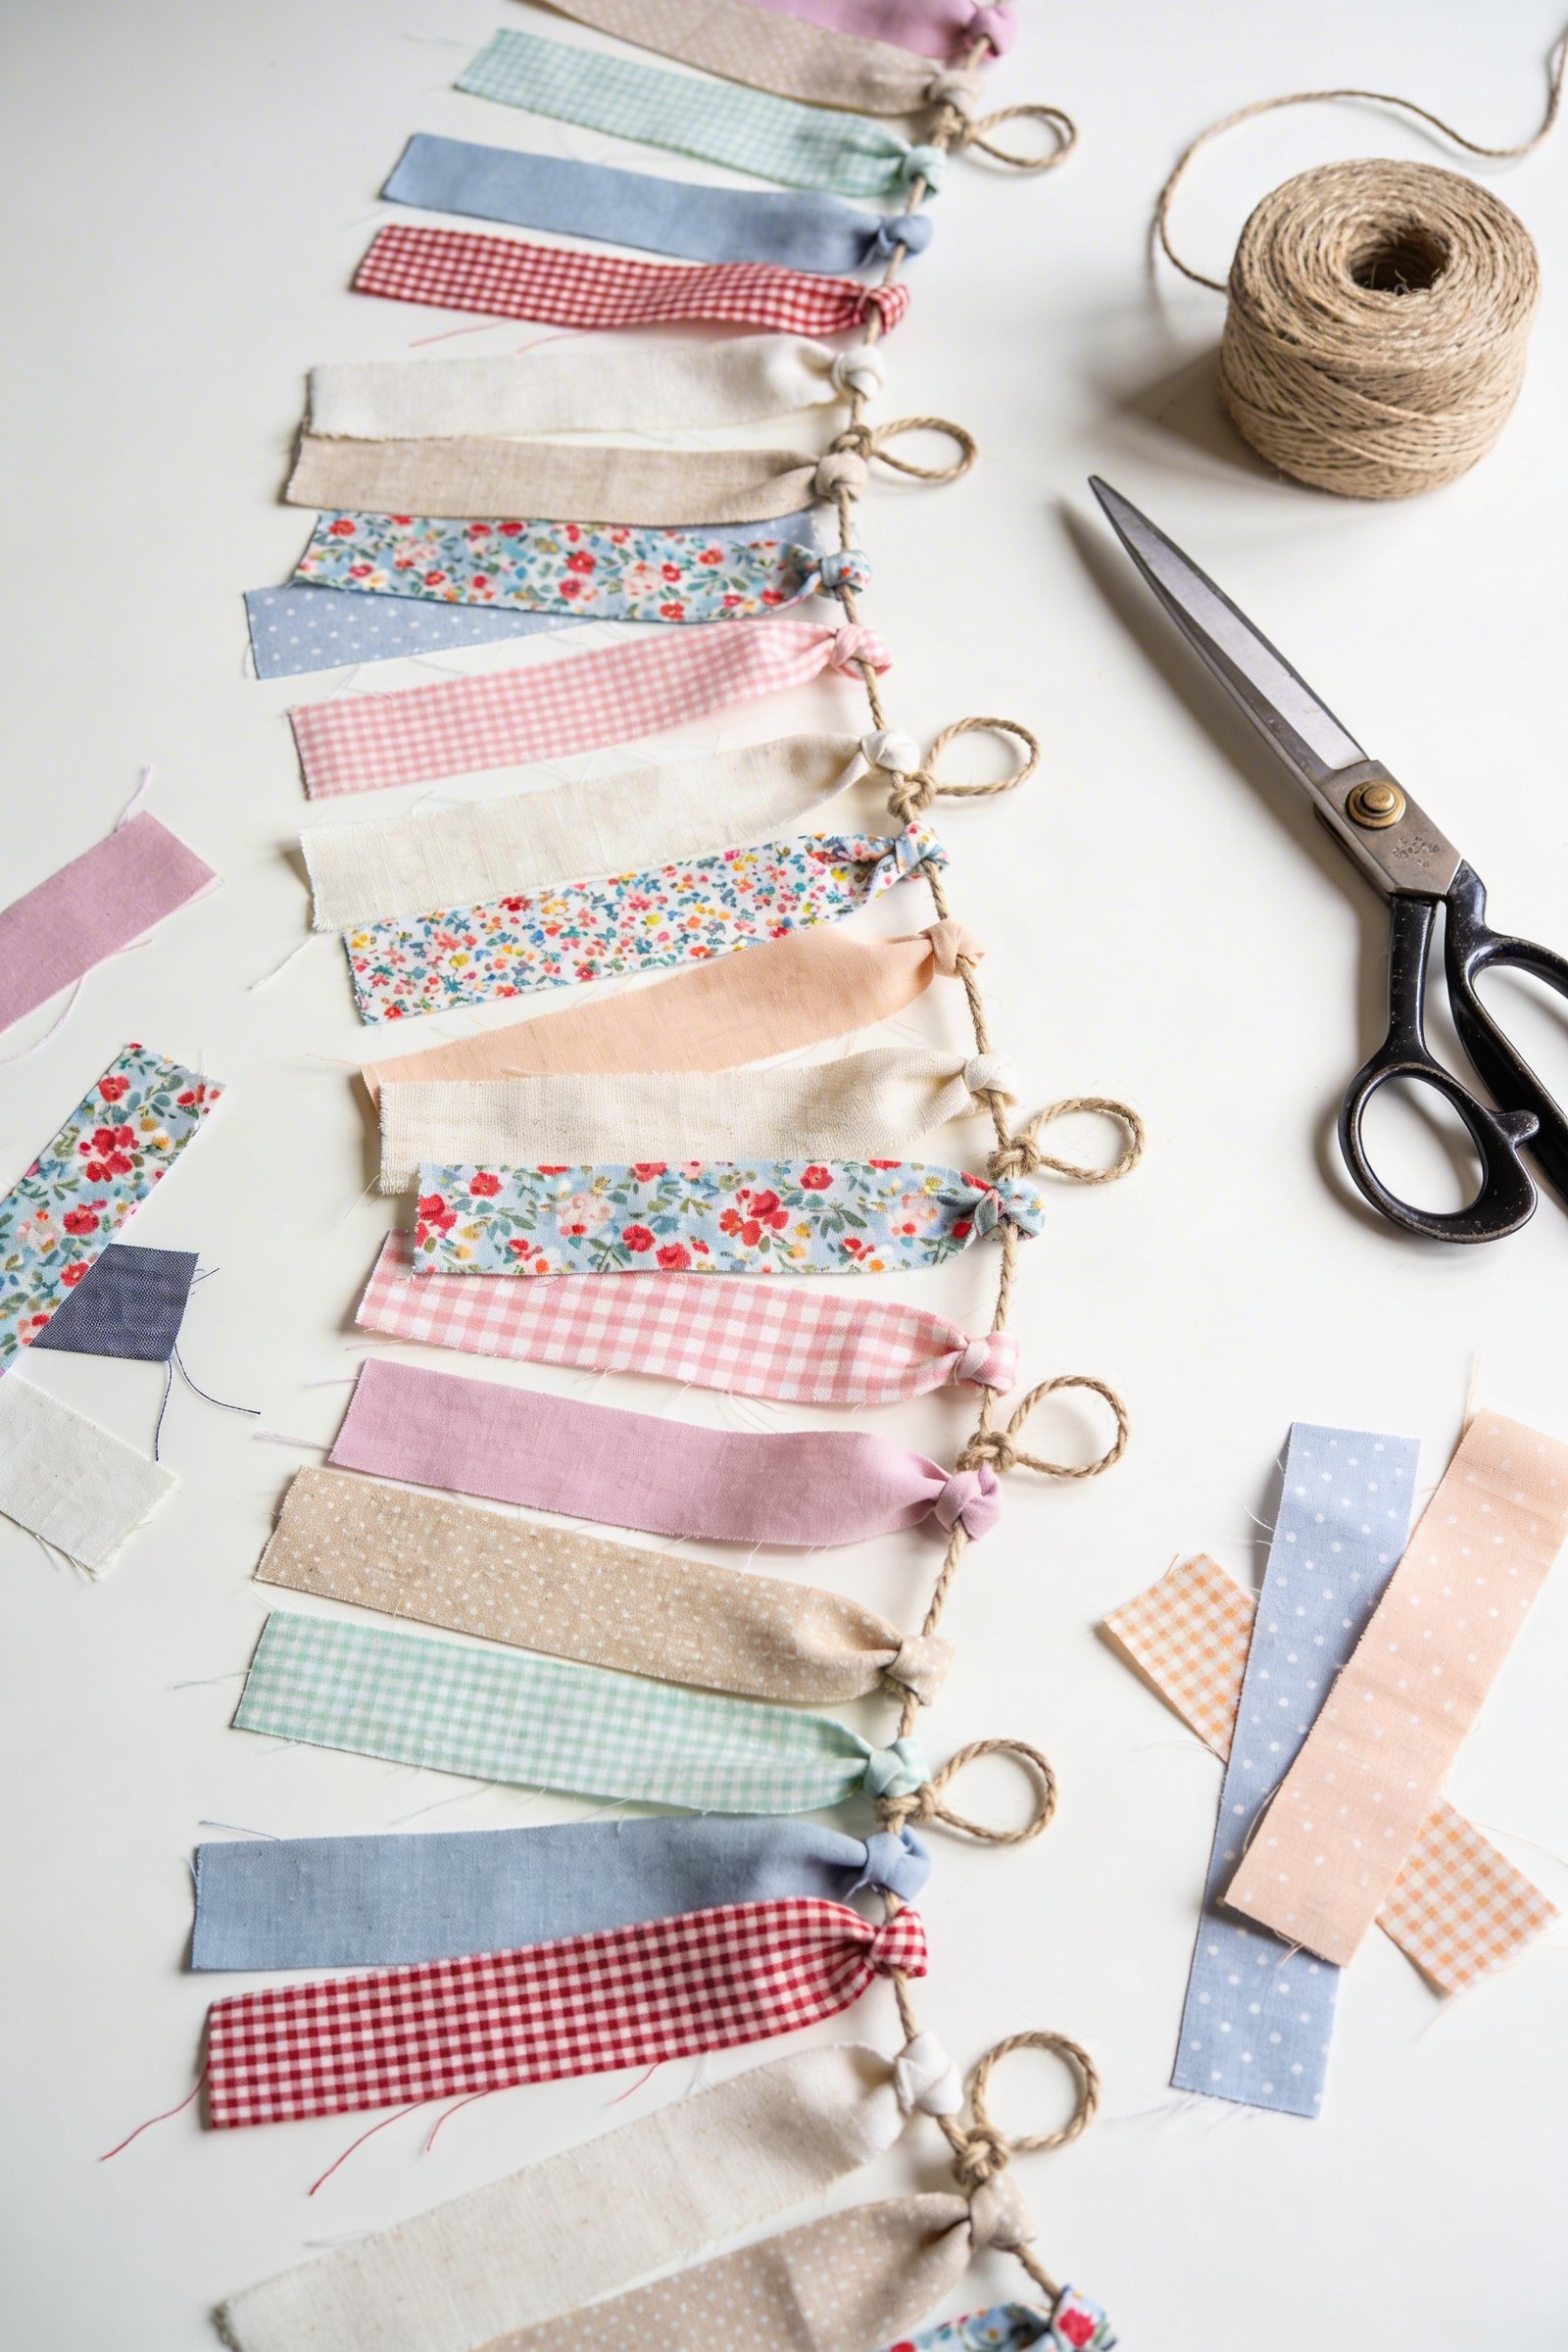
Garlands are the unsung heroes of party decor. They add instant festivity without much fuss. And when they’re made from fabric scraps? Even better! This is a fantastic way to use up those odd-shaped bits and bobs you’ve been hoarding.
Upcycle Like a Pro
This garland isn’t just pretty; it’s eco-friendly! You’re giving new life to fabric scraps that might otherwise end up in the bin. Plus, no two garlands will ever be exactly alike, making yours truly unique.
Your Toolkit
* Assorted fabric scraps: The more variety in patterns and colors, the better!
* Twine, ribbon, or sturdy string: For hanging your garland.
* Scissors: For cutting your fabric.
* Optional: Hot glue gun (if you want extra security, but knotting usually suffices).
Garland Glory Guide
This is probably the easiest craft on the list, FYI.
1. Cut your scraps: Cut your fabric scraps into strips. They can be all the same size (e.g., 1 inch wide by 6 inches long) or varying sizes for a more eclectic look. Don’t overthink it!
2. Prepare your string: Cut a length of twine or ribbon to your desired garland length, plus extra for tying.
3. Tie it on: Take one fabric strip, fold it in half, and place the folded end *under* your string. Then, pull the two loose ends of the fabric strip *through* the loop you created by folding it. Pull tight to create a knot.
4. Repeat and space: Continue tying fabric strips onto your string, spacing them as close or as far apart as you like. Mix up colors and patterns for a vibrant look. If any feel loose, a tiny dab of hot glue under the knot can secure them.
Chic No-Sew Fabric Flower Brooches
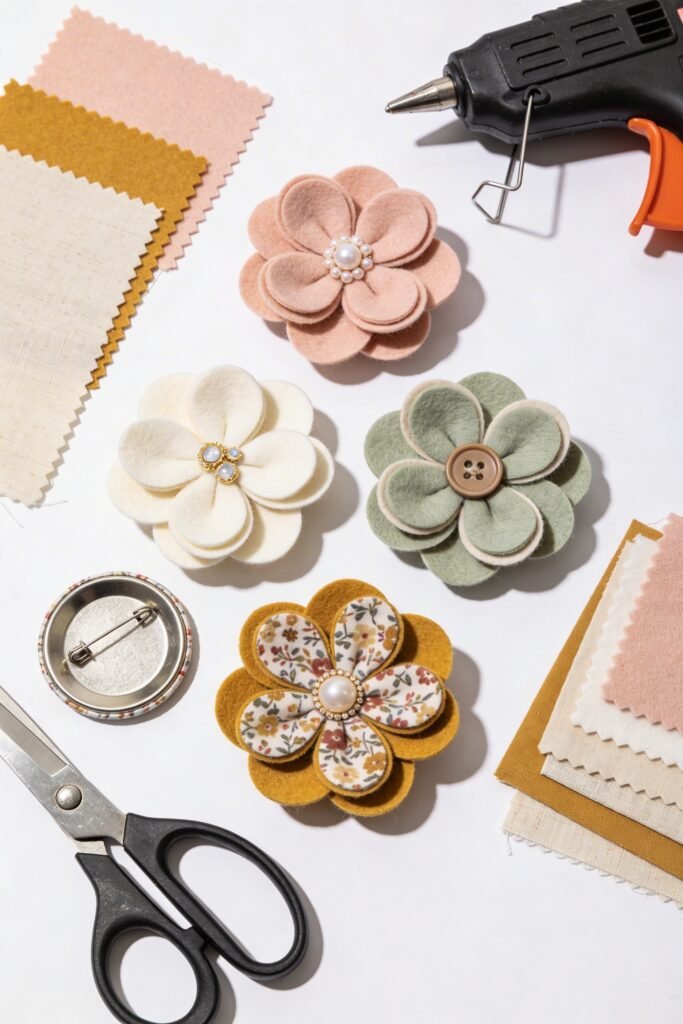
Add a touch of handmade elegance to your outfit, an Easter basket, or even a gift package with these beautiful fabric flower brooches. They look intricate but are surprisingly simple to assemble without a single stitch.
Bloom Without the Loom
These flowers are versatile. Pin them to a jacket, glue them onto a plain headband, or use them as fancy embellishments for gifts. They’re a lovely way to highlight a gorgeous fabric pattern.
What to Grab
* Fabric scraps: Choose fabrics that hold their shape a bit, like felt, linen, or cotton with some body. Different colors and patterns for layers work well.
* Scissors: Precision is helpful here.
* Hot glue gun and glue sticks: Your floral architect.
* Brooch pin backings: You can find these at any craft store.
* Optional: A button, bead, or small charm for the flower center.
Petal Power Playbook

Let’s make some fabric blooms!
1. Cut your circles: Cut several circles of varying sizes from your fabric. You’ll want at least 5-7 circles per flower, ranging from about 1 inch to 3 inches in diameter. Don’t worry about perfect circles; slight imperfections add character!
2. Create petals (method 1 – folded): Take a circle, fold it in half, then fold it in half again to create a quarter-circle “petal.” Repeat for all circles.
3. Assemble the flower base: Start with your largest folded circles. Apply a dab of hot glue to the pointed tip of each folded petal and glue them onto a small, flat fabric circle (or even a felt disc) as your base, arranging them in a circular pattern. Overlap them slightly.
4. Layer it up: Continue layering smaller folded petals on top of the first layer, working your way towards the center.
5. Add the center: Once all your petals are glued, hot glue a button, bead, or a small, scrunched-up fabric circle into the very center of your flower.
6. Attach the backing: Flip your finished flower over. Hot glue a brooch pin backing securely to the back. Hold it firmly until the glue sets.
Frequently Asked Questions
What kind of fabric is best for no-sew projects?
For most no-sew projects involving glue, cotton, felt, linen, and thin upholstery fabrics are fantastic. They’re easy to cut, hold glue well, and aren’t too slippery. Avoid anything too thick or stretchy, as it can be tricky to work with without a machine.
How do I make sure the glue holds up?
The key is to use the right glue for the job (fabric glue, Mod Podge, or hot glue gun) and to apply it correctly. Use thin, even layers of liquid glue, and for hot glue, ensure you’re pressing firmly while it’s still hot. Always let glue dry completely before handling or using the item. A good quality glue makes a huge difference!
Are these crafts kid-friendly?
Absolutely! Many of these projects, especially the fabric-wrapped eggs and the scrap garland, are great for kids. Just be mindful with hot glue guns – younger children should have adult supervision or use a craft glue that dries clear instead. The fabric carrots might be a bit fiddly for very small hands but are perfect for older kids.
Can I wash these no-sew fabric items?
Generally, no. Since these projects rely on glue rather than stitches, washing them can dissolve the glue or cause the fabric to come apart. These are primarily decorative items. If they get dusty, a light wipe with a damp cloth (not soaking!) should be fine, but test a small, inconspicuous area first.
What if I don’t have a hot glue gun?
No worries! For projects like the fabric-wrapped eggs, fabric glue or Mod Podge works perfectly. For the carrots, bunny ears, and flower brooches, you can use a strong fabric adhesive, but it will require more drying time and might not offer the same instant hold as hot glue. Plan your crafting time accordingly!
Time to Get Your No-Sew On!
See? Who needs a sewing machine when you’ve got a killer pair of scissors, some fabulous fabric scraps, and a trusty glue gun? These no-sew Easter DIY crafts are proof that you can create beautiful, personalized decorations and gifts without ever touching a needle and thread. So go ahead, unleash your inner fabric artist. Your Easter basket (and your sanity) will thank you. Happy crafting!