Forget boring store-bought decor this Easter! Get ready to transform your home into a springtime wonderland with these unbelievably charming craft ideas. We’re talking about projects so cute, your guests will think you hired a professional decorator. Seriously, prepare for compliments!
1. Whimsical Moss Bunny Figurines: Your New Favorite Shelf Sitters

Who doesn’t love a fluffy bunny? These moss-covered cuties are about to become the star of your Easter decor. They bring a touch of natural, rustic charm that feels both sophisticated and utterly adorable.
What You’ll Need:
- Styrofoam bunny forms (various sizes)
- Sheet moss (the kind from craft stores)
- Hot glue gun and glue sticks
- Optional: small googly eyes, tiny pom-pom tails
Cover the bunny forms completely with sheet moss, securing it with hot glue. Don’t be afraid to get a little messy; that’s part of the fun! Once dry, place these little guys on bookshelves, mantels, or as a centerpiece. They’re surprisingly durable and add a gorgeous organic texture to any space.
2. The Cutest Carrot Garland: A Sweet Touch for Any Room

Let’s be real, Easter isn’t complete without carrots, right? This DIY garland is a super simple way to add a pop of orange and green, making your home feel instantly festive. It’s perfect for draping over a doorway or mantelpiece.
Crafting Your Carrots:
- Orange and green felt sheets
- Scissors
- Hot glue or fabric glue
- Twine or ribbon
Cut orange felt into carrot shapes and green felt into leafy tops. Glue the green tops to the wider end of the orange carrots. Once you have a bunch of these, simply glue or tie them onto a length of twine, spacing them out evenly. This garland is so cheerful, it practically screams “spring has sprung!”
3. Elegantly Painted Easter Egg Vases: Upcycle Like a Pro
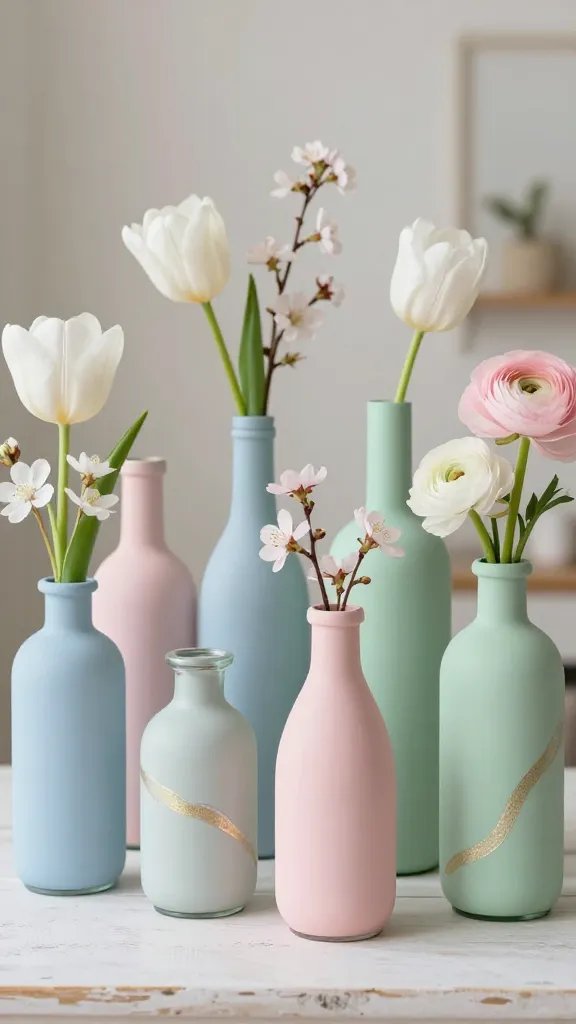
Why buy new vases when you can transform old bottles into stunning Easter statements? This project is all about giving humble glass containers a glow-up with a touch of pastel magic. They look incredibly chic holding a few fresh spring blooms.
Materials for Your Masterpiece:
- Empty glass bottles or jars (various shapes work best)
- Chalk paint in pastel shades (think robin’s egg blue, soft pink, mint green)
- Paintbrushes
- Optional: metallic paint pens for detailing
Clean your bottles thoroughly. Apply two to three coats of chalk paint, allowing each layer to dry completely for a smooth, matte finish. You can add delicate patterns or dots with metallic pens if you’re feeling fancy. These vases are perfect for showcasing daffodils, tulips, or even just some simple greenery.
4. Springtime Fresh Flower Wreath: Welcome Guests with Bloom Power
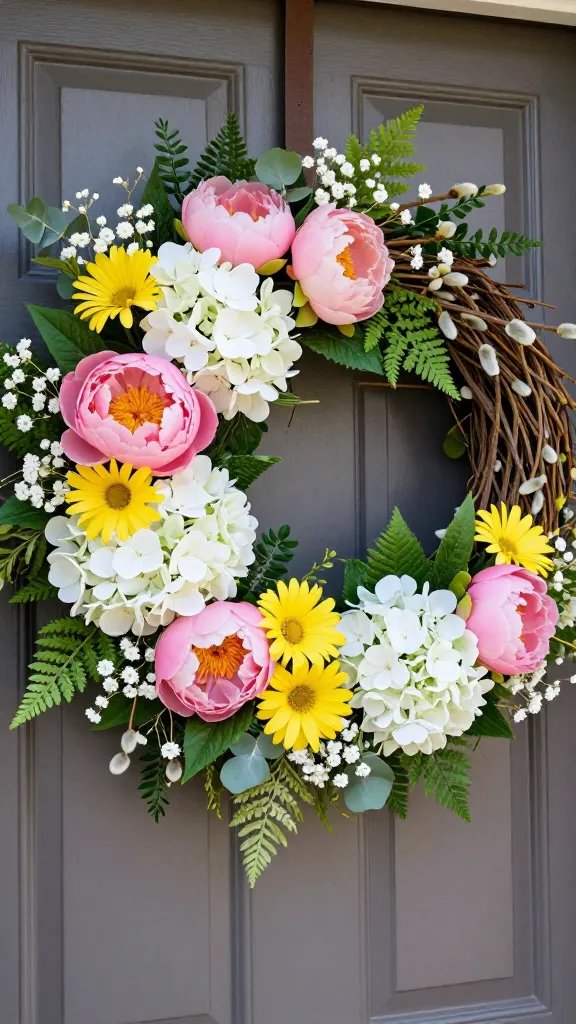
Nothing says “welcome to my spring abode” quite like a vibrant wreath on your front door. While fresh flowers are lovely, a mix of high-quality faux and some real sprigs makes this wreath last longer and look fantastic throughout the season.
Building Your Floral Dream:
- Grapevine wreath base
- Assortment of faux spring flowers (peonies, hydrangeas, daisies)
- Greenery (eucalyptus, fern)
- Floral wire or hot glue
- Optional: a few real sprigs of baby’s breath or pussy willow
Start by attaching your larger flowers and greenery to the grapevine base using floral wire or hot glue. Fill in gaps with smaller blooms and accent pieces. If you’re adding real elements, tuck them in carefully on the day of your Easter gathering. This wreath will instantly elevate your curb appeal, trust me!
5. Adorable Pom-Pom Chick Garland: A Fluffy Flock of Fun

Prepare for cuteness overload! This pom-pom chick garland is ridiculously easy to make and brings an instant smile to anyone’s face. It’s perfect for a child’s room, a kitchen window, or draped across a party table.
Crafting Your Chicks:
- Yellow yarn
- Small pieces of orange felt (for beaks)
- Googly eyes
- Twine or string
- Scissors
Make several yellow pom-poms (you can buy pom-pom makers or use the classic cardboard circle method). Once fluffed, glue on tiny felt beaks and googly eyes to create your chicks. Attach them to a length of twine, and voilà! You have a charming, fluffy garland that’s undeniably cheerful. FYI, these look great mixed with the carrot garland!
6. Bunny Ear Napkin Rings: Elevate Your Easter Table

Hosting Easter brunch? Don’t forget the little details that make a big impact! These bunny ear napkin rings are an easy, inexpensive way to add a playful yet elegant touch to your place settings. Your guests will definitely ooh and aah!
What You’ll Need:
- Felt in pastel colors (white, pink, light blue)
- Scissors
- Hot glue gun
- Empty toilet paper rolls or cardboard tubes
Cut the cardboard tubes into 1-inch rings. Cut bunny ear shapes from the felt, making the inner ear a slightly smaller, contrasting color. Glue the inner ear onto the larger ear. Then, glue the base of the ears to the top of the cardboard ring. Slip your neatly folded napkins through, and you’ve got instant table charm!
7. Ombre Dyed Eggs: A Sophisticated Twist on Tradition
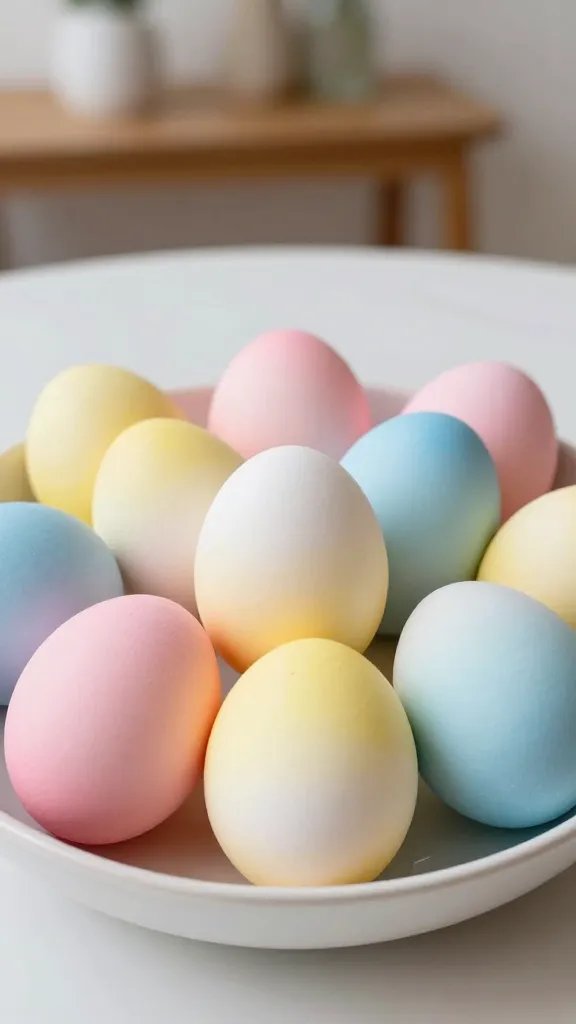
Forget plain old single-color eggs. This year, we’re going ombre! Creating a gradient effect on your Easter eggs makes them look incredibly artistic and modern. It’s a fun project that yields stunning results.
Dyeing Your Ombre Eggs:
- Hard-boiled eggs
- Food coloring or natural dyes (beet juice for pink, turmeric for yellow)
- White vinegar
- Various small bowls or jars
- Spoon or egg dipper
Prepare your dye baths. For ombre, you’ll dip the egg for short periods, increasing the submersion time or adding more dye for darker shades. Start by dipping just the tip, then a little more, and so on, allowing each section to absorb color. The result is a beautifully layered egg that looks too good to crack!
8. Mason Jar Terrariums with Miniature Bunnies: A Tiny World of Wonder
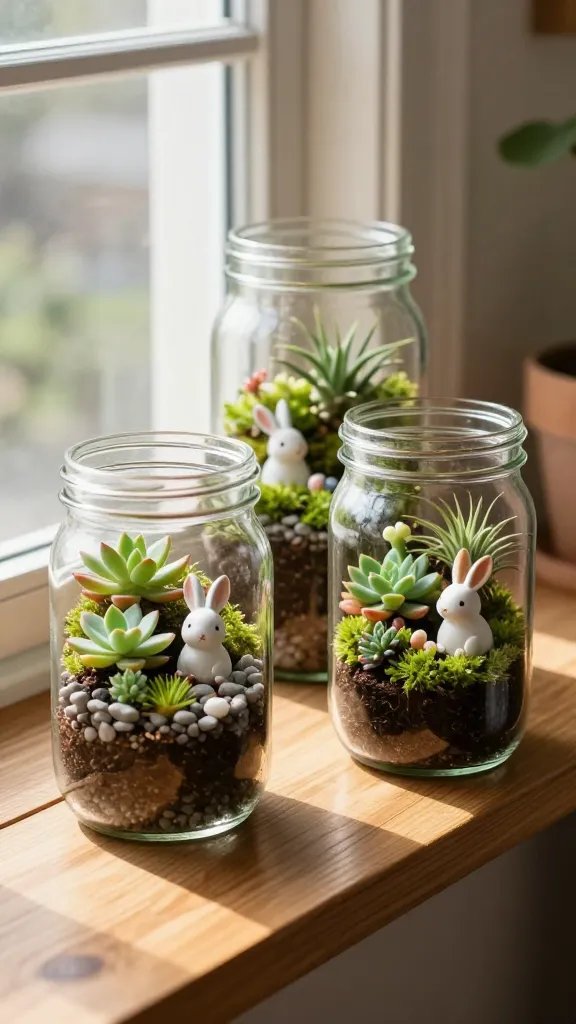
Bring a miniature spring scene indoors with these adorable mason jar terrariums. They’re like little self-contained worlds, perfect for adding a touch of whimsy to a windowsill or side table. Plus, they’re super low maintenance.
Creating Your Mini Ecosystem:
- Mason jars (various sizes)
- Small pebbles or gravel
- Potting soil
- Small succulents or air plants
- Tiny plastic or ceramic bunny figurines
- Moss or decorative stones
Layer pebbles at the bottom for drainage, then add a thin layer of soil. Gently place your succulent or air plant inside. Arrange your miniature bunny and other decorative elements like moss or tiny stones. Seal the jar, and you’ve got a charming, self-contained Easter display that’s surprisingly captivating.
9. Paper Flower Backdrop: A Photo-Ready Wall of Blooms

Want to create a show-stopping focal point for your Easter gathering? A paper flower backdrop is your answer! It’s surprisingly easy to make and offers a huge visual impact, perfect for a dessert table or a photo booth.
Crafting Your Floral Wall:
- Cardstock in various pastel colors
- Scissors or a cutting machine (e.g., Cricut)
- Hot glue gun
- Blu-tack or painter’s tape
Cut out various petal shapes and sizes from your cardstock. Start assembling your flowers, gluing petals around a central point to create full, dimensional blooms. Make a variety of sizes and colors. Once you have a good collection, arrange and attach them to a wall using blu-tack or tape. This backdrop is seriously impressive and makes for amazing photos!
10. The Elegant Easter Tree: A Modern Take on Tradition
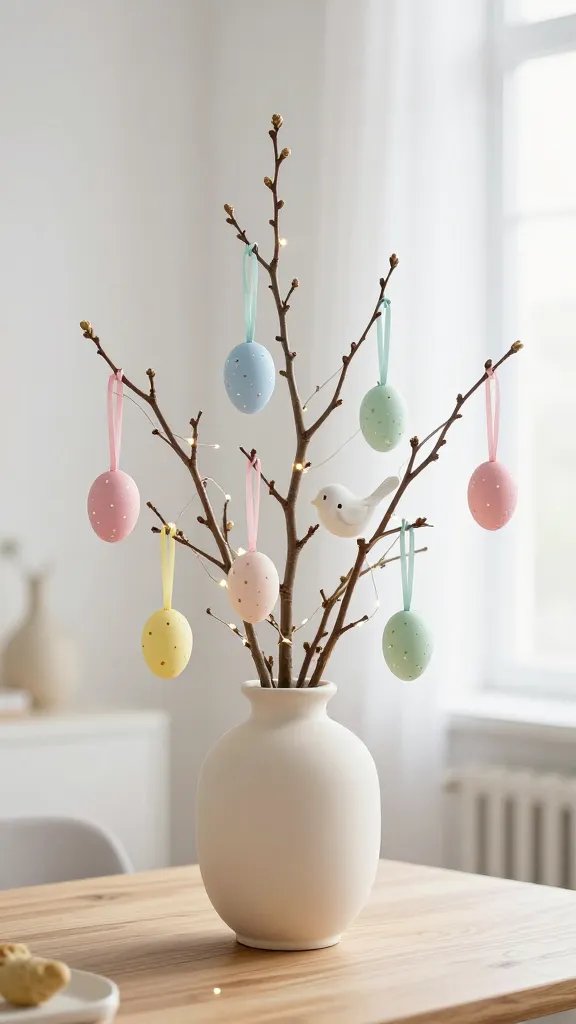
Move over, Christmas tree! The Easter tree is here, and it’s absolutely charming. Decorating bare branches with delicate eggs and spring ornaments creates a beautiful, airy centerpiece that’s both traditional and contemporary. It’s a subtle nod to the season.
Setting Up Your Easter Tree:
- Sturdy branches (from your yard or a craft store)
- A heavy vase or pot
- Small, lightweight Easter egg ornaments (plastic, painted, or blown-out shells)
- Ribbon or string for hanging
- Optional: fairy lights, tiny bird nests
Anchor your branches securely in a vase with sand, pebbles, or floral foam. Then, simply hang your decorated eggs and other small ornaments from the branches using ribbon or string. Add a string of delicate fairy lights for extra sparkle in the evening. This display adds vertical interest and a touch of magic to any room.
11. Charming Carrot Patch Centerpiece: Dig Into Festive Decor
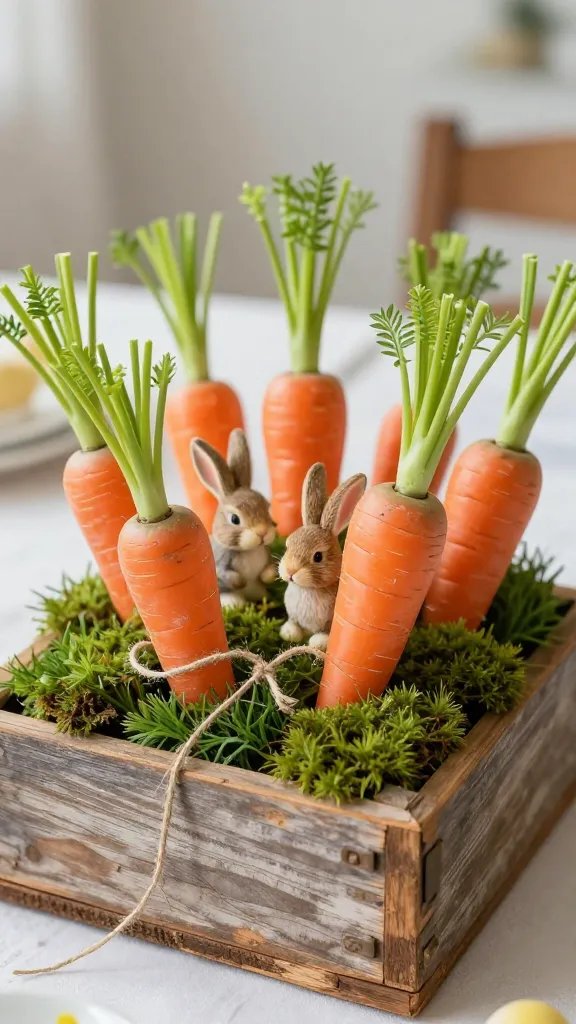
Bring the garden indoors with a delightful carrot patch centerpiece. This rustic yet playful arrangement is perfect for your dining table or an entryway console. It’s a clever way to incorporate natural elements and a bit of whimsy.
Assembling Your Carrot Patch:
- A rectangular wooden box or rustic planter
- Floral foam or crumpled newspaper
- Artificial grass mat or green shredded paper
- A mix of real and/or faux carrots (various sizes)
- Optional: small bunny figurines, moss, twine
Line your box with floral foam or newspaper to provide height. Cover the top with artificial grass or shredded green paper to mimic a patch. Arrange your carrots, sticking them into the foam so they look like they’re “growing.” Add some tiny bunnies peeking out for extra charm. This centerpiece is a conversation starter!
12. The Cheeky Bunny Butt Wreath: A Doorway Delight with a Smile
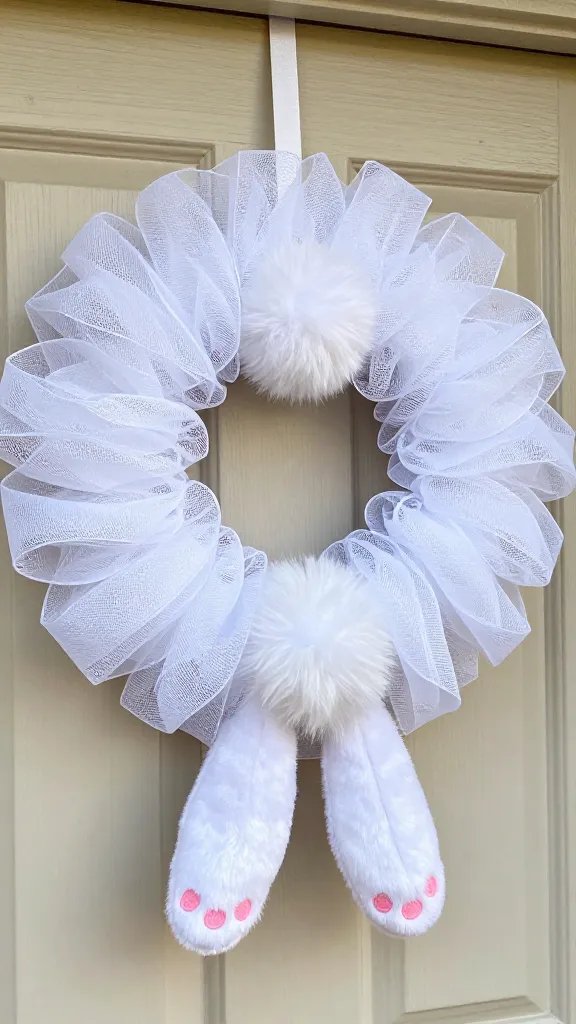
Want something a little different for your front door? This bunny butt wreath is undeniably hilarious and absolutely adorable. It’s a playful take on traditional wreaths that will surely get a chuckle from your guests.
Crafting Your Bunny’s Rear:
- Wire wreath frame
- White mesh ribbon or white tulle
- White felt or faux fur (for the feet)
- Pink felt (for paw pads)
- Large white pom-pom (for the tail)
- Hot glue gun
Wrap the wire wreath frame generously with white mesh ribbon or tulle to create a fluffy base. Cut out two bunny feet shapes from white felt/faux fur and glue on pink felt paw pads. Attach the feet to the bottom of the wreath, facing slightly upwards. Finally, glue the large white pom-pom in the center-bottom of the wreath for the tail. It’s so cute, it’s almost rude!
13. Burlap and Lace Easter Banner: Rustic Elegance for Your Wall
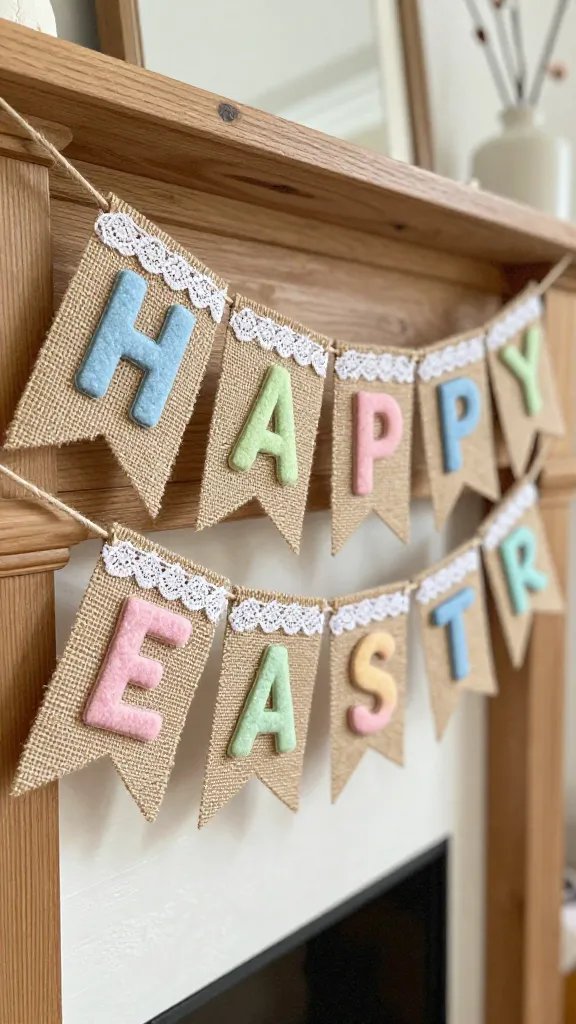
For those who love a rustic chic aesthetic, this burlap and lace banner is a must-make. It combines charming textures with a touch of elegance, perfect for hanging over a mantel, a doorway, or even a dessert bar.
Creating Your Banner:
- Burlap fabric
- Lace trim or doilies
- Pastel-colored felt or fabric paint for letters
- Twine or ribbon
- Hot glue gun
- Scissors
Cut burlap into flag shapes. You can either cut out letters (e.g., “HAPPY EASTER”) from felt and glue them onto each flag, or use fabric paint to stencil them on. Add lace trim along the bottom edge of each flag for a delicate touch. String the flags onto a length of twine, spacing them evenly. This banner adds a beautiful, personalized touch to your Easter decor.
14. “Happy Easter” Letter Blocks: A Colorful Message for Your Home
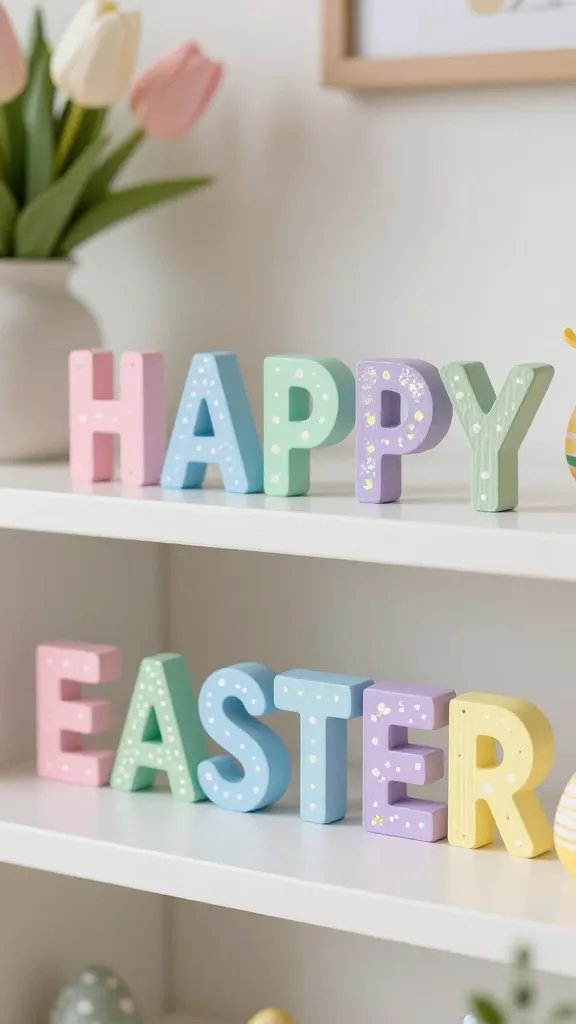
These painted letter blocks are a versatile decoration that can be displayed on a shelf, mantel, or even as part of a centerpiece. They’re easy to customize with your favorite Easter colors and patterns, making them truly unique.
Decorating Your Blocks:
- Wooden blocks (available at craft stores)
- Acrylic paints in pastel shades
- Paintbrushes
- Letter stencils or freehand skills
- Optional: Mod Podge, glitter, decorative paper
Paint each block a different pastel color. Once dry, use stencils or freehand to paint one letter of “HAPPY EASTER” on each block. You can add polka dots, stripes, or decoupage with decorative paper for extra flair. Seal with Mod Podge for durability. These blocks are a cheerful way to spell out your holiday greetings!
15. Egg Carton Flower Garland: Upcycle into a Burst of Blooms

Who knew humble egg cartons could be transformed into such beautiful flowers? This craft is eco-friendly, budget-friendly, and results in a charming, textural garland that adds a lovely homemade touch to any space. It’s a testament to creative recycling!
Making Your Carton Flowers:
- Empty cardboard egg cartons
- Scissors
- Acrylic paints in spring colors
- Small buttons or beads for centers
- Hot glue gun
- Twine or string
Cut out individual egg cups from the carton. Trim and shape the edges to resemble flower petals. Paint them in various spring colors, letting them dry completely. Glue a small button or bead into the center of each flower. Once you have a collection, hot glue the finished flowers onto a length of twine to create your garland. This garland is a unique and delightful way to celebrate spring!
There you have it, folks! Fifteen fantastic Easter craft decorations that are guaranteed to make your home feel extra special and festive this season. So grab your glue gun, unleash your creativity, and get ready to craft your way to the most charming Easter ever. Happy making!