Blank rental walls are the mood killer of otherwise cute apartments. But you don’t need a power drill or a security deposit refund miracle to fix them. These renter friendly DIYs are easy, chic, and totally removable—so your landlord can chill and your walls can glow up.
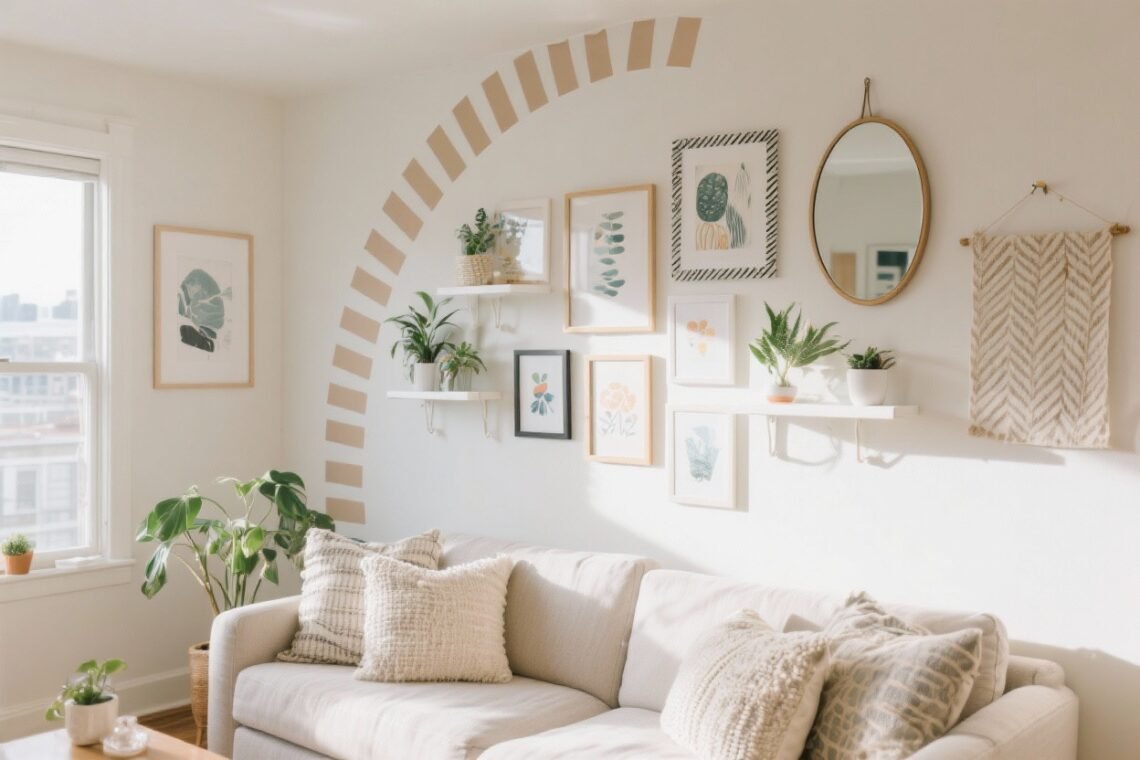
1. Peel-And-Stick Gallery Wall That Looks Curated

When in doubt, make a gallery wall. But skip the nail holes and use Command strips or peel-and-stick photo shelves. The trick is mixing sizes and textures so it looks intentional, not dorm-room chaotic.
How to Pull It Off
- Choose a vibe: Black-and-white photos, vintage posters, or bold abstracts. Consistency = chic.
- Map it on the floor: Lay everything out first. Snap a pic as your layout guide.
- Use lightweight frames: Plastic or acrylic frames keep things secure with removable strips.
- Add a wild card: Throw in a woven fan, mini mirror, or fabric swatch for texture.
FYI: Keep pieces within a 6–8 inch spacing for a tight, gallery-like feel. And if you hate eyeballing, painter’s tape grids are your best friend.
2. Fabric Drop Cloth “Wallpaper” (No Paste, No Stress)

Yes, you can fake wallpaper without risking your deposit. A cotton painter’s drop cloth becomes a luxe-looking wall panel with a little hemming tape and removable double-sided mounting tape.
Step-By-Step
- Cut panels: Measure your wall height and cut the fabric with a few extra inches.
- Finish edges: Use iron-on hem tape for clean lines—no sewing required.
- Mount with removable tape: Apply tape around the edges and a few vertical strips in the center.
- Style it: Go solid for a calming backdrop, or stencil a subtle pattern for “I paid a designer” energy.
Bonus: This trick hides ugly paint jobs and adds warmth. When it’s time to move, peel and roll it up for your next place.
3. Oversized Removable Mural With Poster Tiles

Want a statement without painting? Try a DIY mural using peel-and-stick poster tiles or large removable prints. The collage look is modern, graphic, and renter-proof.
The Easy Method
- Pick a theme: Landscapes, line art, or color-field abstracts. Keep a consistent palette.
- Grid it out: Use painter’s tape to outline a rectangle “mural zone.”
- Install tiles: Start from the center and work outward for clean alignment.
- Layer a ledge: Add a skinny, removable picture ledge below for tiny frames and plants.
Pro tip: If you’re mixing vendors, match paper finishes (all matte or all satin) so it reads as one piece. Shiny next to matte can look chaotic, IMO.
4. Sculptural Wall With Foam Trim (No Nails Needed)
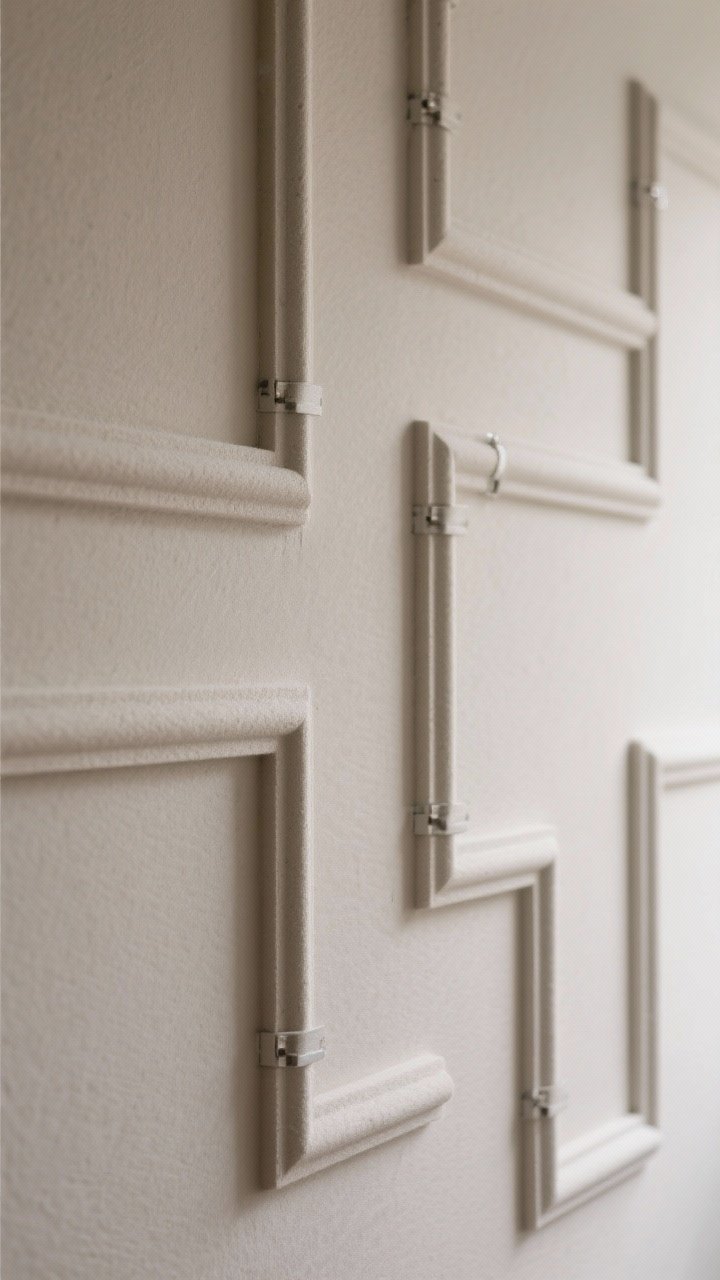
Architectural vibes without the contractor. Create faux paneling or geometric lines using lightweight foam molding and removable mounting strips. Paint the molding before installing for a flawless look.
Design Ideas
- Classic boxes: Four or six equal rectangles give subtle, Paris-apartment energy.
- Modern angles: Diagonal lines or asymmetrical frames for a contemporary twist.
- Tone-on-tone: Match the molding to your wall color for a luxe, shadowy texture.
Tip: Use a miter box for clean corners. If your paint has to be removable, pick renter-safe wall paint that cleans off or stick to neutral foam hues.
5. Removable Sconce Look With Plug-Ins And Cord Covers

Lighting is wall art, fight me. Hang plug-in sconces with adhesive hooks and hide the cord with paintable cord channels attached using removable strips. It looks built-in, minus the electrician bill.
What You’ll Need
- Plug-in sconces: Search for wall-mount versions with on-cord switches.
- Adhesive hooks + strips: Use weight-rated options for complete peace of mind.
- Cord covers: Paint them to match the wall or go brass for a statement.
Layer sconces around a mirror or above a bed for serious boutique-hotel drama. Just confirm the fixture’s weight and follow the strip instructions (cleaning with alcohol first matters, FYI).
6. Washi Tape or Vinyl Decal “Headboard” And Accent Shapes

Don’t want a bulky headboard? Draw one on. Use washi tape or removable vinyl to create arches, half-moons, or linear patterns that frame your bed, desk, or sofa.
Design Cheats
- Arches: Tape a string to a pencil and tack the string center to make a perfect curve.
- Grid walls: Thin black tape in a loose grid gives museum-chic energy.
- Color-block panels: Create overlapping shapes—terracotta, blush, sage—for a playful, “Instagram happened here” look.
If you’re feeling extra, add peel-and-stick wood slats inside the taped “headboard” outline for texture. It’s removable, dramatic, and ridiculously photogenic.
7. Floating Fabric Art With Magnetic Frames
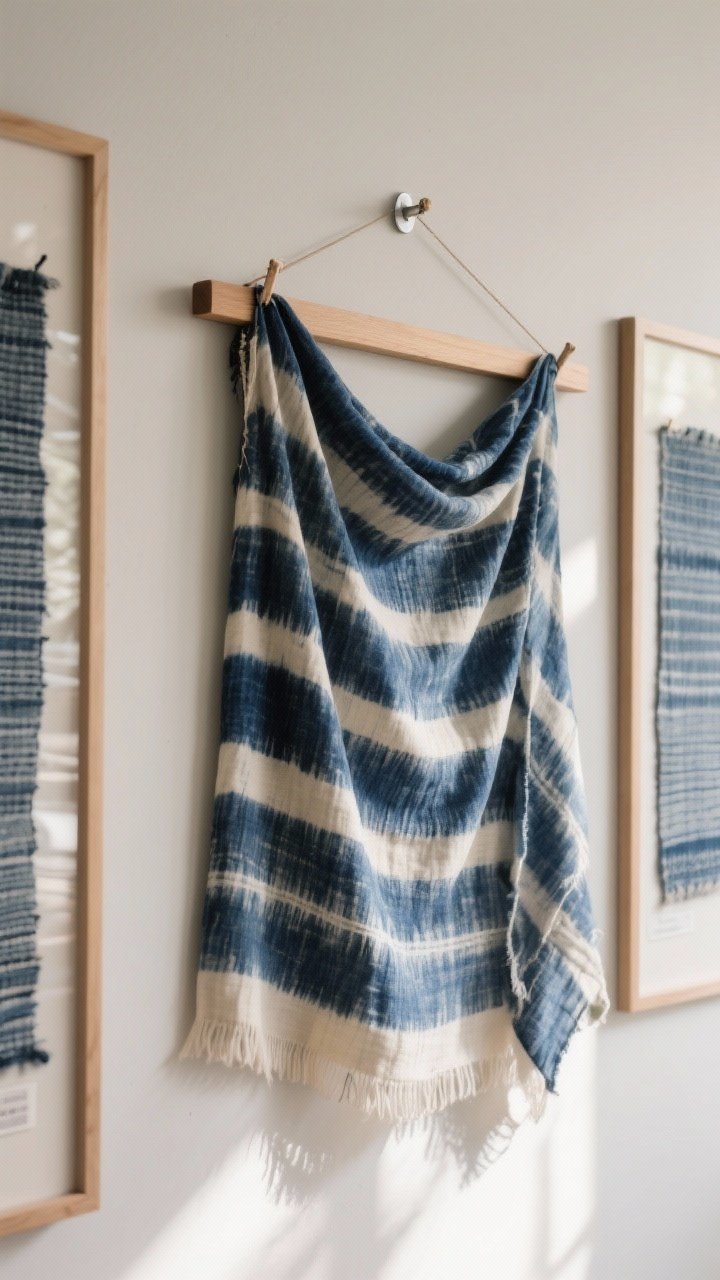
Textiles bring warmth that framed prints can’t touch. Hang a scarf, tea towel, or vintage textile using adhesive hooks and a magnetic poster hanger. It’s lightweight, renter-safe, and instantly elevated.
Make It Gallery-Worthy
- Scale up: Go bigger than you think—oversized textiles make small rooms feel intentional, not cluttered.
- Steam it: A quick steam removes creases so it reads as art, not laundry.
- Frame the moment: Add two matching pieces on either side for a symmetrical, designer look.
Swap the textile with the seasons—linen in summer, wool or batik in winter. It’s the easiest decor refresh you’ll ever do.
Quick Tips To Keep Your Security Deposit Intact
- Test first: Try any adhesive in a hidden spot and wait 24 hours.
- Clean walls: Alcohol wipe before sticking. Dust = failure.
- Mind the weight: Check the rating on strips and hooks. Double up for heavier frames.
- Keep packaging: Landlords love seeing removable products used. It helps during move-out talks.
You don’t need to live with blank walls—or lose your deposit—to have a space that feels like you. Pick one of these renter friendly apartment wall decor DIY projects and give your home a little personality. Start small, have fun, and prepare for the “Where’d you get that?” texts to roll in.