Easter snuck up on you again, didn’t it? One minute you’re recovering from Valentine’s Day, the next, bunnies and pastel eggs are staring you down from every supermarket aisle.
If you’re anything like me, your Pinterest board is overflowing with elaborate craft ideas you’ll never actually attempt, and now you need something, anything, to make it look like you actually planned for this holiday.
Good news, my friend: I’ve got your back. Forget the complicated tutorials and the hours of drying time; these 8 last-minute Easter DIY crafts are so quick, you can whip them up in under an hour. Let’s get crafting!
Egg-cellent Embellishments (No Dye Required!)
Let’s be real, who has time for messy dye kits when Easter is practically knocking on the door? Not me, and probably not you either! These ideas let you transform plain eggs into festive masterpieces without a single drop of food coloring. Your kitchen will thank you, and so will your fingers.
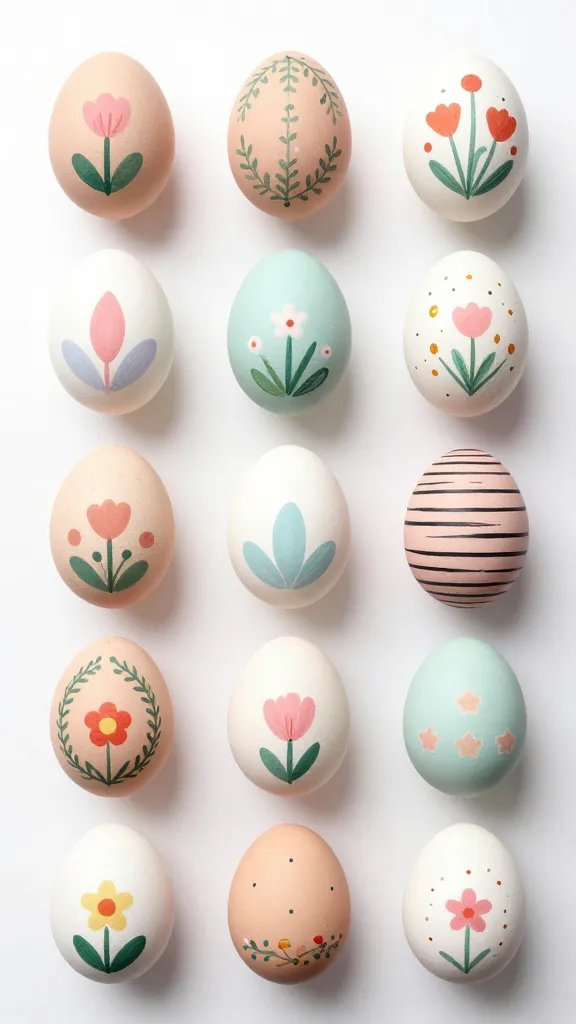
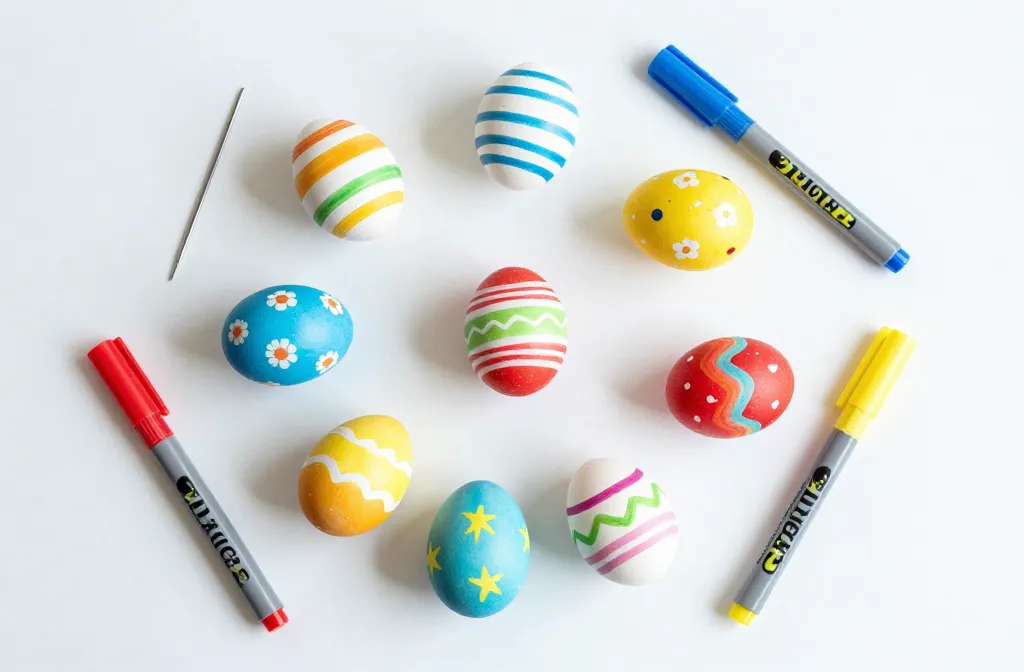
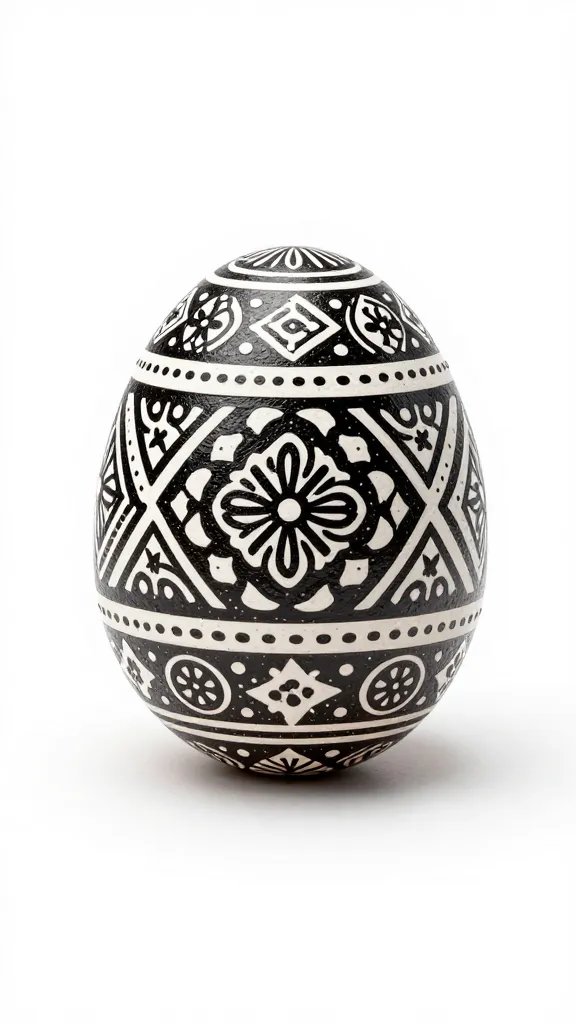
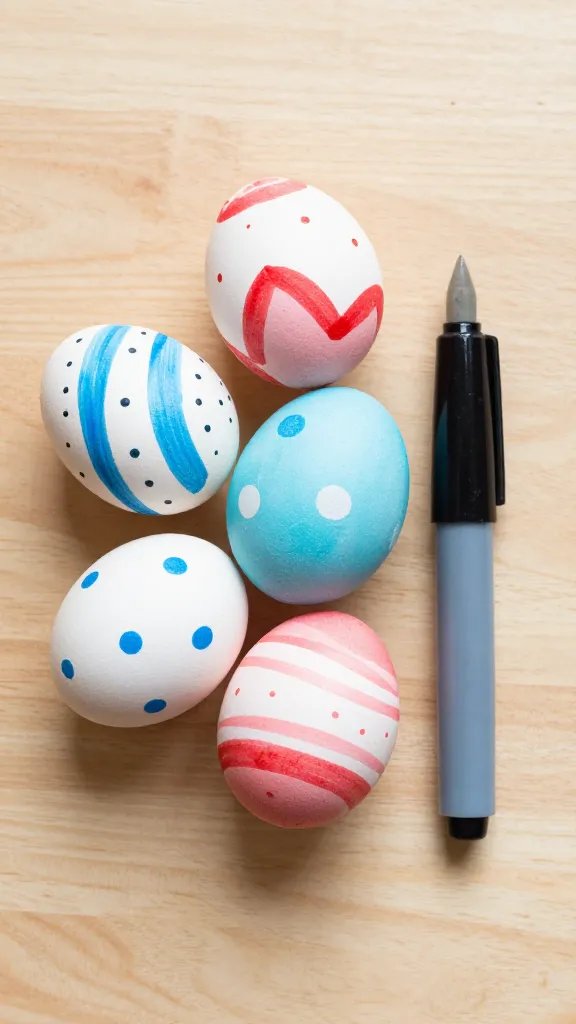
1. Sharpie Art Eggs
Forget the vinegar smell and stained fingers. Grab some hard-boiled (or even plastic) eggs and your favorite permanent markers. The possibilities are endless! This is where your inner artist, no matter how dormant, can shine.
- Materials: Hard-boiled or plastic eggs, Sharpie markers (various colors).
- Make polka dots, stripes, or intricate Zentangle-inspired patterns.
- Draw cute bunny faces or tiny carrots.
- Write festive messages like “Hoppy Easter!” or “You’re Egg-cellent!”
Pro Tip: Metallic Sharpies on dark-colored eggs? Game changer, IMO. So chic, so easy.
2. Glitter & Sticker Eggs
If drawing isn’t your jam, or you need something even quicker (is that even possible?), glitter and stickers are your best friends. This is also a fantastic option for involving the littlest helpers without too much supervision.
- Materials: Hard-boiled or plastic eggs, glitter glue, various stickers (Easter-themed or just fun shapes).
- Apply dots, stripes, or swirls of glitter glue directly onto the egg.
- Stick on bunnies, flowers, or geometric shapes.
- Combine both for maximum sparkle and minimal effort.
Bonus: If you have any leftover temporary tattoos, those work surprisingly well too! Just press and dampen.
Paper Power: Quick Decor & Cards
Paper is probably the most versatile craft material on the planet. It’s cheap, readily available, and transforms into pretty much anything with a pair of scissors and a bit of glue. Let’s put that paper to work for some instant Easter cheer.
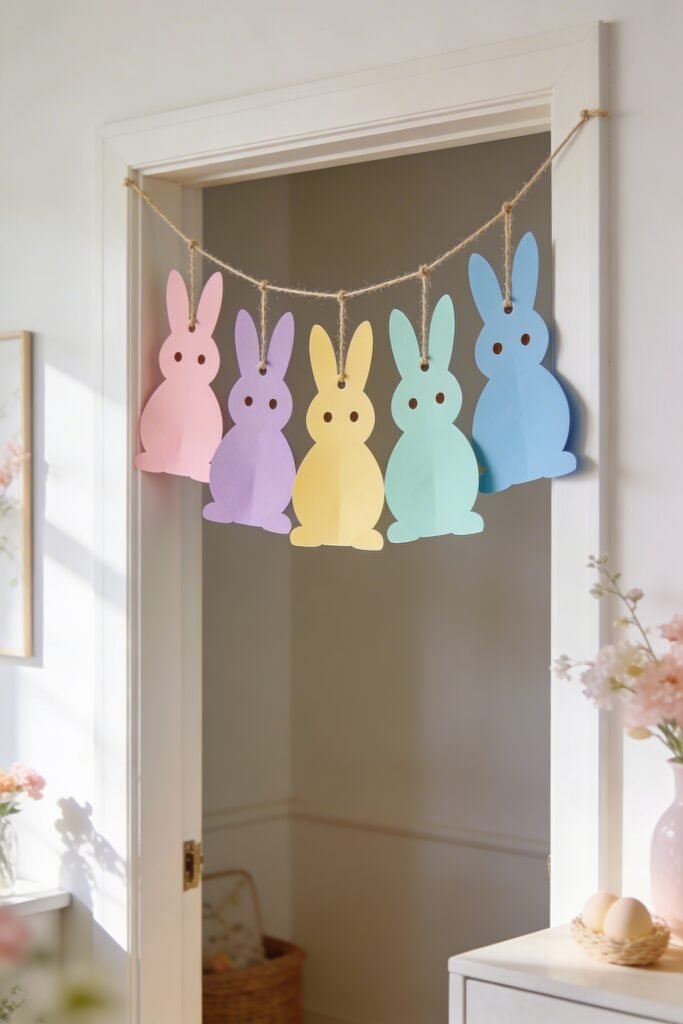
3. Paper Bunny Garland
This garland adds instant festivity to any doorway, mantel, or window. It looks super cute and takes mere minutes to assemble. Who knew a few paper bunnies could make such a statement?
- Materials: Construction paper (pastel colors), scissors, string or twine, hole punch, glue stick (optional).
- Fold a piece of construction paper in half and draw half a bunny shape along the fold.
- Cut out several bunnies. You can freehand or use a template if you’re feeling fancy.
- Punch two holes in the top of each bunny’s ears.
- Thread your string or twine through the holes, alternating directions to keep the bunnies facing forward.
Quick Hack: Use a craft punch if you have one for even faster, uniform shapes!
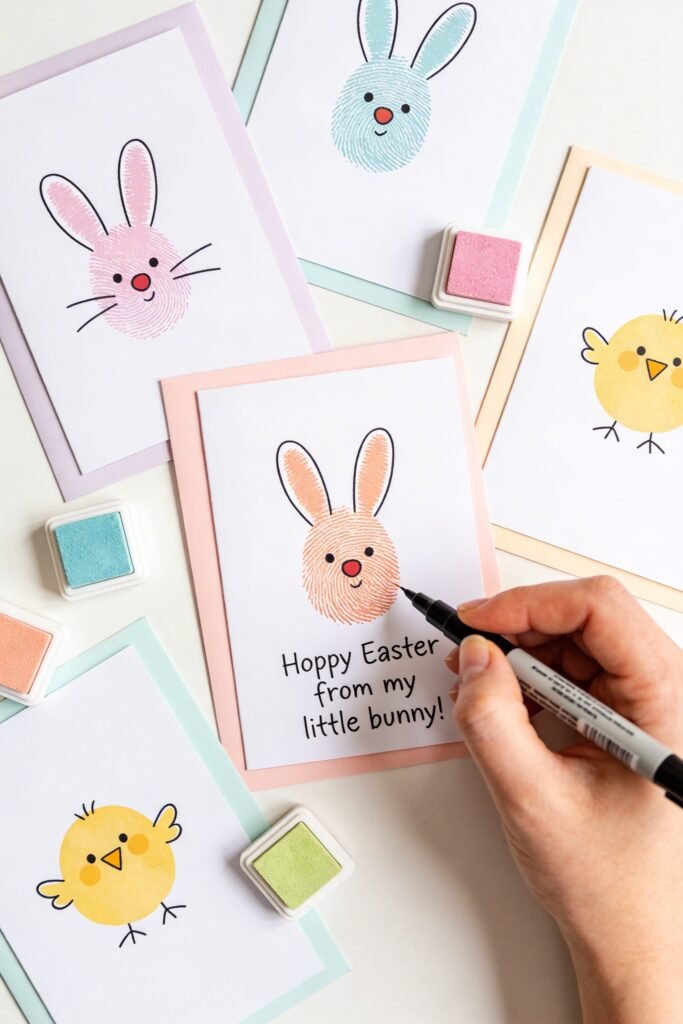
4. Fingerprint Easter Cards
Personalized cards always win hearts, and these fingerprint cards are ridiculously adorable and quick. They’re perfect for kids to make for grandparents, teachers, or anyone who appreciates a handmade touch.
- Materials: Cardstock or blank cards, washable ink pads (various colors), fine-tip markers.
- Press a finger onto an ink pad and then onto the card to create a “body.”
- Use a marker to add details: bunny ears, eyes, a nose, whiskers, or chick wings and a beak.
- Write a sweet message like “Hoppy Easter from my little bunny!”
You can make a whole family of fingerprint bunnies or a flock of chicks in under 15 minutes. Pure genius, if I do say so myself.
Critter Creations in a Flash
Bunnies and chicks are the undisputed mascots of Easter. Why not bring them to life with some simple materials you probably already have lying around? These crafts are charming and surprisingly sturdy.
5. Cotton Ball Bunnies
These fluffy little guys are almost too cute to handle! They make great table decorations, additions to an Easter basket, or even little gifts. Plus, who doesn’t love playing with cotton balls?
- Materials: Cotton balls, construction paper (pink, white, or brown), googly eyes, glue (craft glue or hot glue gun).
- Glue several cotton balls together to form a bunny body. Think one big one for the body, a smaller one for the head.
- Cut out ear shapes from construction paper – pink for the inner ear, white/brown for the outer.
- Glue the ears to the back of the head, and then attach the googly eyes.
- Add a tiny cotton ball for a tail, and maybe draw on some whiskers with a marker.
Boom! Instant cuteness. These are ridiculously easy and always get a smile.
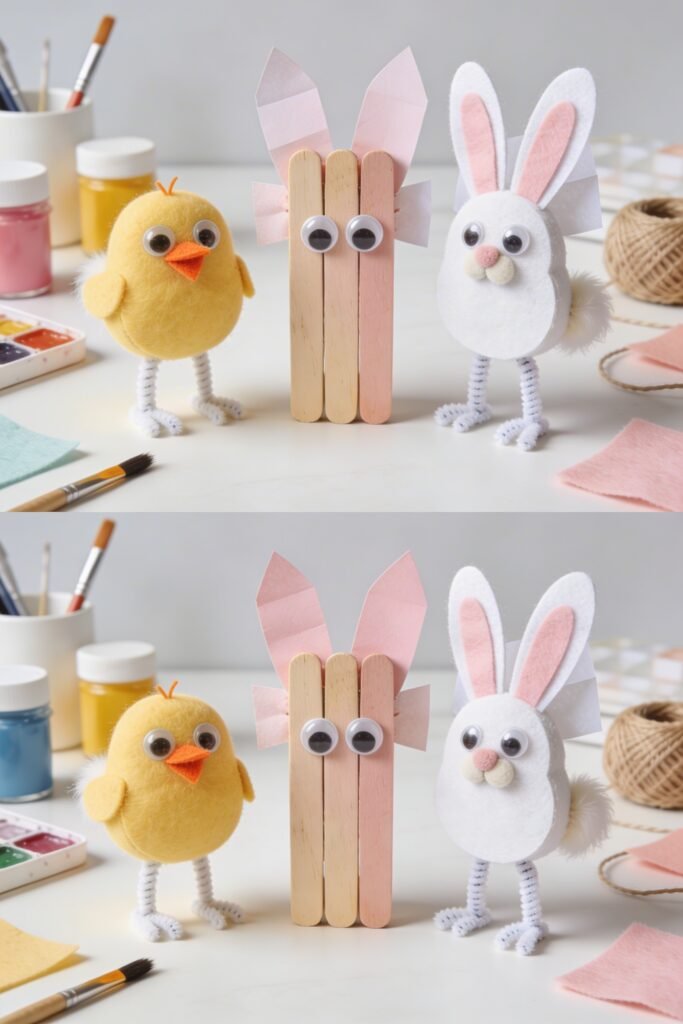
6. Popsicle Stick Chicks & Bunnies
Popsicle sticks aren’t just for summer treats anymore. They’re a fantastic base for quick 3D crafts. This project is super versatile – make chicks, bunnies, or even little lambs!
- Materials: Popsicle sticks, craft paint (yellow, pink, white), googly eyes, orange/pink felt or paper, glue.
- Glue three popsicle sticks together side-by-side. Let it dry for a minute.
- Paint one side yellow for a chick or pink/white for a bunny.
- Once dry, glue on googly eyes.
- For a chick: Cut a small triangle from orange felt for a beak and glue it on.
- For a bunny: Cut two long ear shapes from felt/paper and glue them to the back of the top stick.
You can even add a pipe cleaner for legs or a fluffy tail. The world is your popsicle stick oyster!
Basket Boosters & Sweet Surprises
An Easter basket doesn’t have to be store-bought and boring. With a few simple additions, you can personalize it and make it feel extra special, even if you’re assembling it five minutes before the egg hunt.
7. DIY Easter Basket Filler
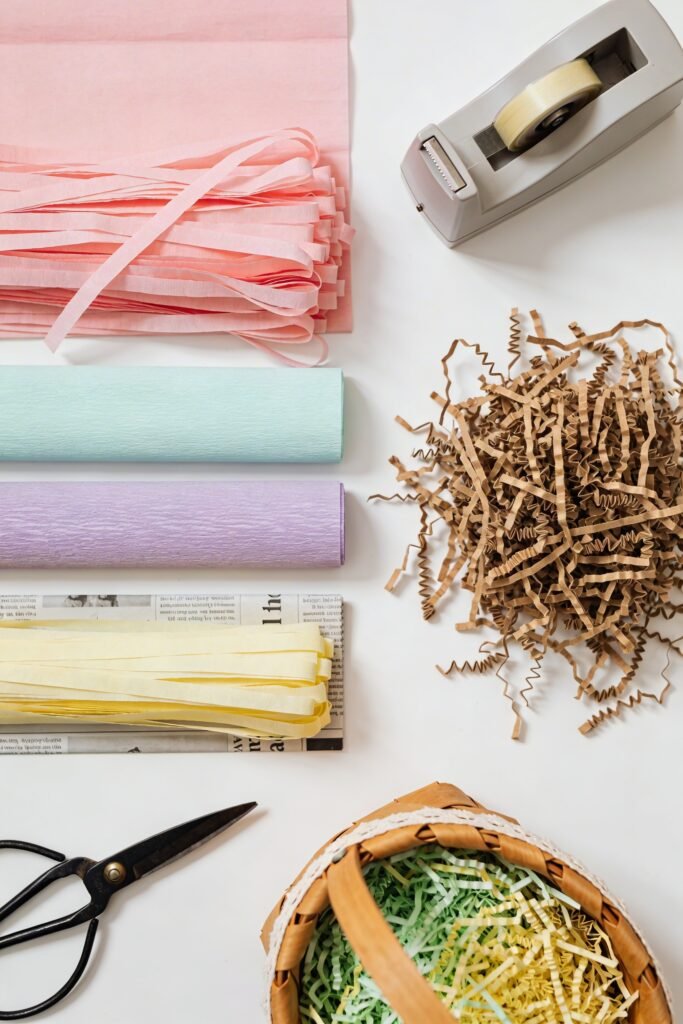
Forget those expensive plastic grass bags. You can create beautiful, eco-friendly, and surprisingly chic basket filler with materials you probably already have. Plus, it’s way more fun to make.
- Materials: Tissue paper (various pastel colors), old newspapers or magazines, scissors or paper shredder.
- For tissue paper: Stack several sheets, fold them, and cut thin strips. Fluff them up.
- For newspaper/magazines: Use a paper shredder for perfectly uniform strips, or hand-cut irregular strips for a more rustic look.
- Mix and match colors and textures for a custom filler that looks way more expensive than it is.
My take: I actually prefer shredded paper over plastic grass. It’s softer, looks better, and you can recycle it later. Win-win!
8. Mason Jar Treat Holders
Mason jars are the unsung heroes of last-minute crafting. They’re sturdy, versatile, and instantly elevate anything you put inside them. For Easter, they become adorable treat holders or mini vases.
- Materials: Mason jars, pastel acrylic paint, ribbon, Easter candy or small flowers.
- Paint the outside of your mason jars in pastel colors. You can do solid colors, stripes, or polka dots. Let them dry (this is the longest part, but quick if you use a hairdryer!).
- Tie a festive ribbon around the rim of each jar.
- Fill with jelly beans, chocolate eggs, or a few fresh spring flowers.
These make fantastic hostess gifts, party favors, or just cute decor for your Easter brunch table. They look like you put in way more effort than you actually did, which is always the goal, right?
Frequently Asked Questions
Can I use regular glue instead of hot glue for these crafts?
For most of these, yes! Craft glue, school glue, or even a glue stick will work. Hot glue just speeds up the drying process significantly, which is super helpful when you’re on a tight schedule. If you’re working with kids, stick to craft glue for safety.
What if I don’t have all the exact materials listed?
Get creative! That’s the beauty of last-minute DIY. No construction paper? Use cardstock, newspaper, or even paper plates. No googly eyes? Draw them on with a marker. No ribbon? Use yarn, string, or strips of fabric. The spirit of DIY is making do with what you have.
Are these crafts kid-friendly?
Absolutely! Most of these crafts are perfect for kids of all ages, with varying levels of supervision needed. The Sharpie eggs, fingerprint cards, and cotton ball bunnies are especially great for little hands. Just make sure an adult handles any cutting or hot glue.
How long do these crafts actually take?
The “under an hour” claim is legit! Many of these, like the Sharpie eggs or paper garland, can be done in 15-20 minutes. Even the more involved ones, like the popsicle stick critters, shouldn’t take more than 30-45 minutes, especially if you’re making a few at once.
Can I make these ahead of time?
You totally can! While they’re designed for last-minute, making them a day or two before Easter means zero stress on the actual holiday. Just store them carefully so they don’t get squashed or dusty.
Hoppy Crafting!
See? No need to panic. Easter can still be festive, fun, and filled with charming handmade touches, even if you started planning five minutes ago. These quick crafts prove you don’t need a craft room full of supplies or an entire weekend to make something special. So grab what you’ve got, put on some tunes, and get ready to impress everyone with your “effortless” Easter decor. Happy Easter, you crafty genius!