Ready to ditch the winter blues and infuse your home with some serious spring vibes? Easter isn’t just about chocolate bunnies anymore; it’s a golden opportunity to get crafty and deck out your space. These ten projects are about to become your new obsession, transforming your home into a fresh, vibrant sanctuary that screams “hello, sunshine!”
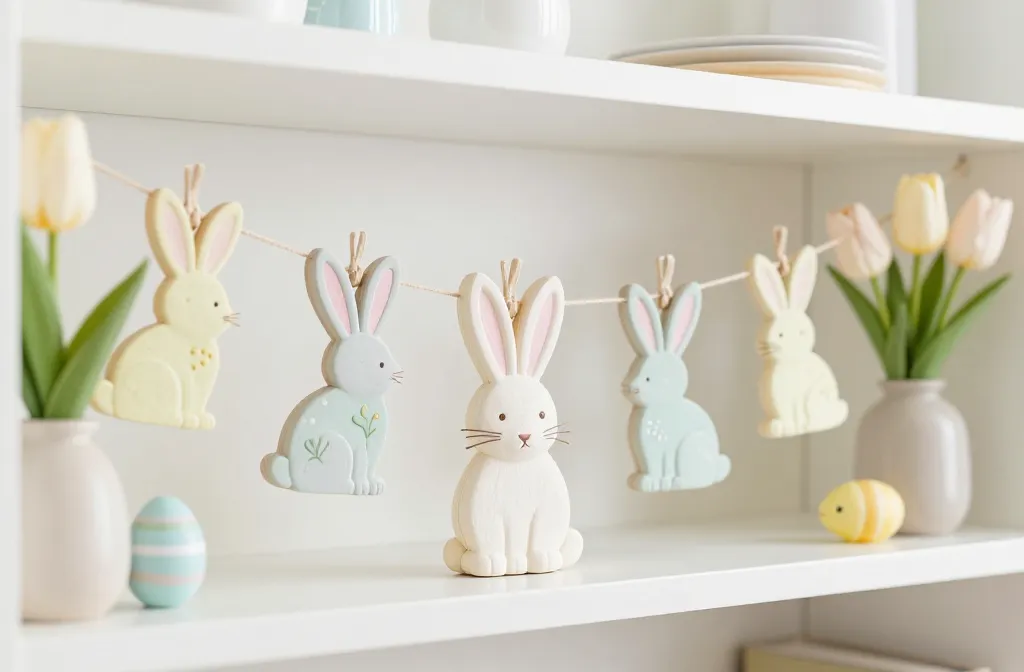
1. Whimsical Bunny Garland: A Hop, Skip, and a Craft!
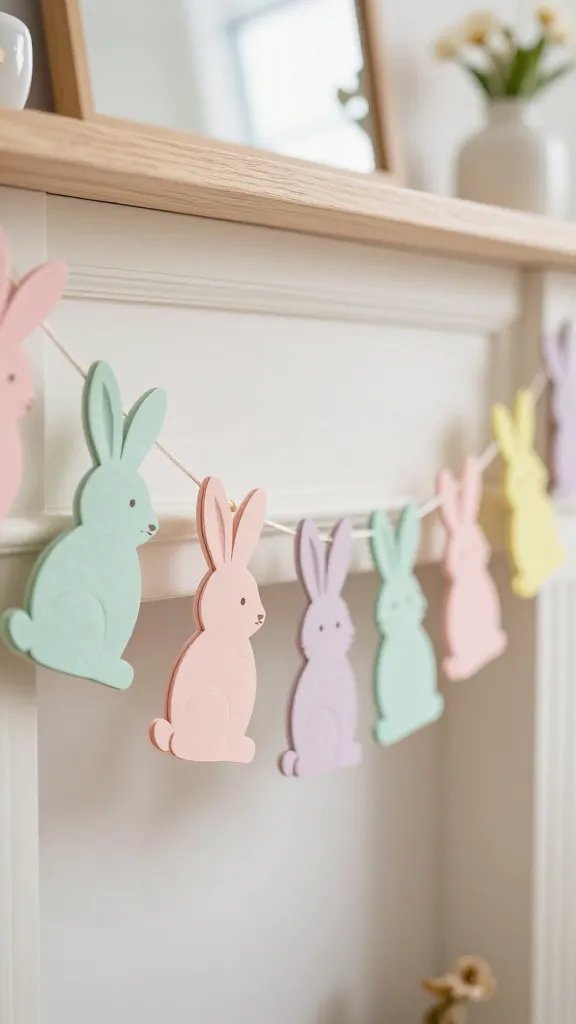
Who doesn’t love a good garland? They’re simple, impactful, and instantly add a festive touch to any space. This DIY bunny version is not only adorable but also incredibly customizable, letting your inner artist shine.
Imagine tiny, fluffy bunnies parading across your mantelpiece or greeting guests from your entryway. Seriously, this project is a total mood booster and surprisingly easy to pull off, even for crafting newbies.
Materials You’ll Need:
- Cardstock: Choose pastel colors like mint green, baby blue, soft pink, and sunny yellow.
- Bunny Template: Find one online or freehand a simple bunny silhouette.
- Cotton Balls or Small Pom-Poms: For those cute, fluffy tails!
- Twine or Ribbon: To string your bunnies together.
- Craft Glue or Hot Glue Gun: For secure attachment.
- Scissors and Pencil: The usual suspects for cutting and tracing.
Crafting Your Hoppy Decor:
Start by tracing your bunny template onto the cardstock. Don’t be shy; make a bunch! The more bunnies, the merrier your garland will be. Cut them out carefully – this is where precision pays off, but a slightly wobbly bunny has its own charm, IMO.
Next, glue a small cotton ball or pom-pom onto each bunny’s backside for that quintessential fluffy tail. Let them dry completely. Once they’re ready, arrange your bunnies along your twine or ribbon, leaving a small gap between each. Secure them in place with a dab of glue on the back of each bunny.
This garland is perfect for draping over a doorway, along a shelf, or even as a backdrop for your Easter brunch. It’s a sweet, playful touch that brings instant spring cheer.
2. Upcycled Eggshell Planters: Tiny Gardens of Joy
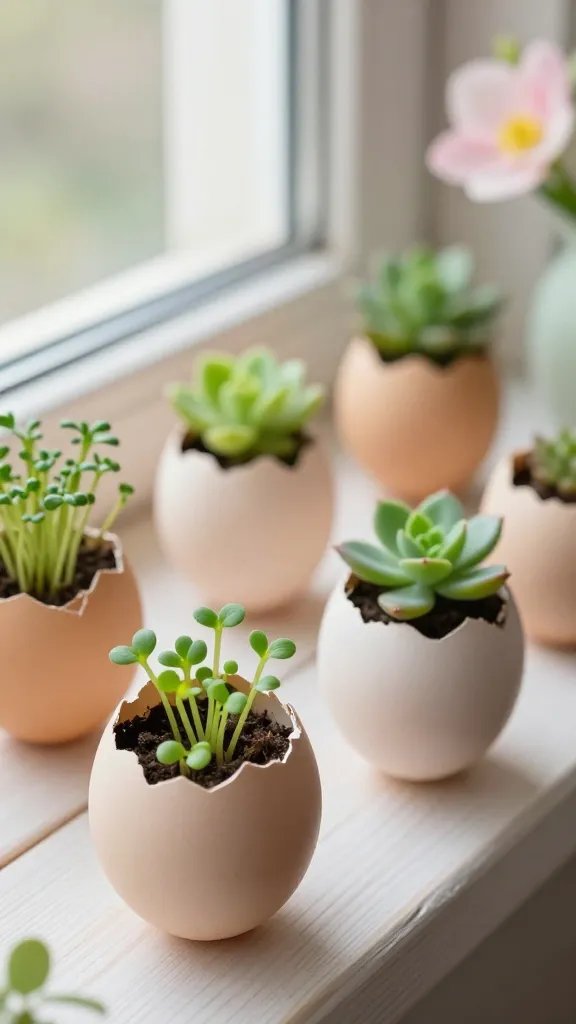
Don’t toss those eggshells after breakfast! They’re about to become the cutest, most eco-friendly mini planters you’ve ever seen. This project is all about sustainability and bringing a touch of natural beauty indoors.
These little wonders are fantastic for tiny succulents, cress, or even small flower seedlings. They make charming place settings for Easter dinner or a delightful display on a windowsill.
What You’ll Gather:
- Empty Eggshells: Carefully crack them towards the top, rinse thoroughly, and let them dry.
- Acrylic Paints and Small Brushes: Think spring colors – soft greens, blues, yellows, and whites.
- Potting Soil: Just a tiny bit!
- Small Plants or Seeds: Succulent cuttings, small herbs, or fast-growing cress seeds work perfectly.
- Egg Carton or Small Holders: To keep your planters stable.
Planting Your Petite Paradise:
First, ensure your eggshells are clean and dry. If you want to add drainage, gently poke a tiny hole in the bottom with a pin, but be super careful not to crack the shell entirely. Now for the fun part: painting! Get creative with stripes, polka dots, or simple solid colors. You can even try a delicate floral pattern if you’re feeling ambitious.
Once the paint is dry, spoon a small amount of potting soil into each eggshell. Gently place your tiny plant or sprinkle your seeds. A little water, and voilà! You’ve got a miniature garden that’s both beautiful and a conversation starter.
These eggshell planters are an adorable way to celebrate new life and add a fresh, green element to your Easter decor. They’re also a fantastic activity for kids!
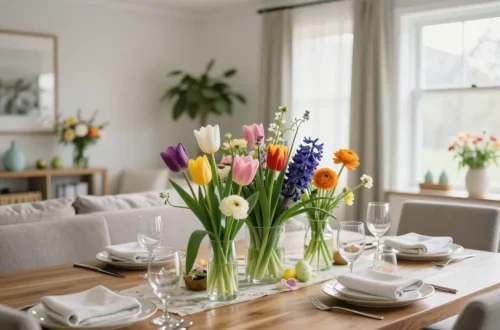
3. Lush Floral Wreath: A Blooming Welcome

Nothing says “welcome spring!” quite like a beautiful wreath adorning your front door. Forget those sad, dusty wreaths from last year; this project is about creating a vibrant, fresh focal point that will make your neighbors green with envy.
A well-made wreath instantly elevates your home’s curb appeal and sets a cheerful tone before anyone even steps inside. Plus, crafting one is surprisingly therapeutic.
Essentials for Your Wreath:
- Grapevine Wreath Base: Available at any craft store.
- Faux Flowers or Fresh Blooms: Choose a mix of spring favorites like tulips, daffodils, hyacinths, and cherry blossoms.
- Greenery: Eucalyptus, ferns, or other leafy stems to fill out the wreath.
- Floral Wire and Wire Cutters: For securing everything tightly.
- Ribbon: A pretty bow for hanging, if desired.
Crafting Your Floral Masterpiece:
Start by laying out your chosen flowers and greenery to get a sense of your design. Think about balance and color distribution. Begin by attaching your larger pieces of greenery to the grapevine base using floral wire. Weave them in and out, securing them tightly.
Next, add your larger focal flowers, distributing them evenly around the wreath. Fill in any gaps with smaller blooms and additional greenery, creating depth and fullness. Don’t be afraid to snip stems to different lengths for a more natural, organic look. Once everything is secure, add a lovely ribbon for hanging, or simply hang it as is.
This wreath isn’t just decor; it’s a statement piece that ushers in the beauty of spring with open arms. It’s reusable year after year if you opt for quality faux flowers, making it a smart investment in cheer.
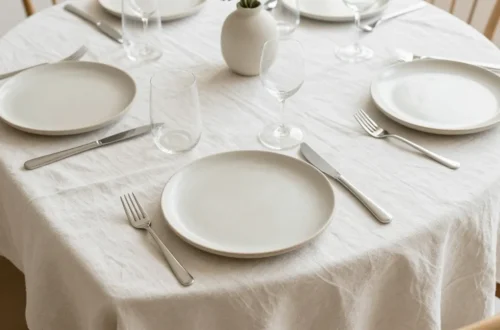
4. Rustic Mason Jar Centerpieces: Charm in a Jar
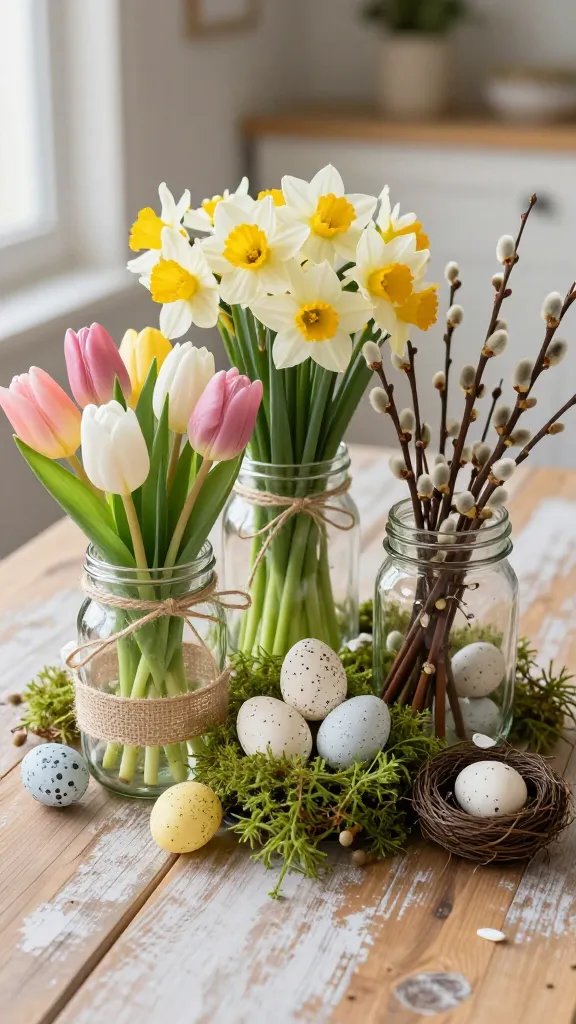
Mason jars are the unsung heroes of DIY decor, and for good reason! They’re inexpensive, versatile, and lend a charming, rustic touch to any setting. For Easter, they become perfect vessels for creating delightful centerpieces.
Whether you’re hosting a big family brunch or just want to add a touch of warmth to your kitchen table, these mason jar creations are simple yet incredibly effective. They’re basically a blank canvas for your spring-inspired imagination.
Gather Your Jar-tastic Supplies:
- Mason Jars: Various sizes (pint, quart) add visual interest.
- Twine, Lace, or Burlap Ribbon: For wrapping and embellishing.
- Fairy Lights (Battery Operated): To add a magical glow.
- Small Flowers or Greenery: Fresh or faux, whatever you prefer.
- Decorative Eggs or Small Figurines: Bunnies, chicks, or even mini bird nests.
- Sand or Small Pebbles: To anchor items or add texture.
Assembling Your Jar Charm:
Start by wrapping the neck or middle of your mason jars with twine, lace, or burlap ribbon. You can secure it with a tiny dab of hot glue. For a magical touch, carefully insert a strand of battery-operated fairy lights into some of the jars. The soft glow is just *chef’s kiss*.
In other jars, add a layer of sand or small pebbles at the bottom, then arrange a few fresh spring flowers or a sprig of greenery. Pop in a decorative egg or a tiny bunny figurine to complete the Easter theme. Group several jars of varying heights together on a tray or runner for an eye-catching display.
These centerpieces are incredibly adaptable and can be tailored to any color scheme or style. They’re perfect for adding a touch of cozy elegance to your Easter table or any corner of your home.
5. Playful Carrot Patch Door Hanger: A Whimsical Welcome
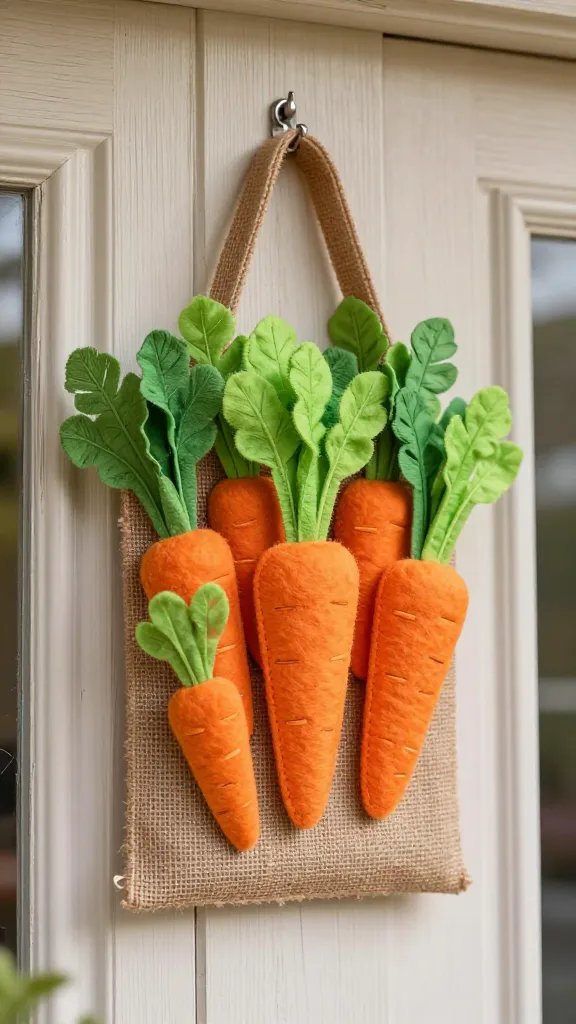
Why stick to a traditional wreath when you can have a full-blown carrot patch on your door? This project is all about embracing the playful side of Easter and creating something truly unique that will make everyone smile.
It’s an unexpected twist on door decor that instantly signals fun and festivity. Plus, it’s a great way to use up some fabric scraps and get creative with textures.
What You’ll Need to Cultivate:
- Burlap Fabric: A rectangular piece for the hanger base.
- Orange Felt: For the carrots.
- Green Felt or Green Raffia: For the carrot tops.
- Hot Glue Gun and Glue Sticks: Your best friend for this project.
- Scissors: For cutting shapes.
- Twine or Rope: For hanging.
- Optional: Small wooden sign or stencil for a “Happy Easter” message.
Growing Your Door Decor:
Cut your burlap into a rectangular shape – think about the size of a standard door hanger. Hem the edges with glue or by folding if you want a neater finish, but a rustic raw edge also looks great! Attach a loop of twine or rope to the top for hanging.
Now, cut out various sizes of carrot shapes from the orange felt. Make them slightly irregular for a more organic look. For the carrot tops, cut strips of green felt or use green raffia for a more textured effect. Glue the green tops to the wider end of each orange carrot.
Arrange your felt carrots onto the burlap base, overlapping them slightly to create a “patch” effect. Once you’re happy with the arrangement, hot glue them securely in place. You can even add a small wooden sign that says “Happy Easter” or “Carrot Patch” if you’re feeling extra fancy. This door hanger is a fantastic way to welcome guests with a touch of whimsy and humor. It’s definitely a conversation starter!
6. Elegant Decoupage Easter Eggs: Art You Can Hold
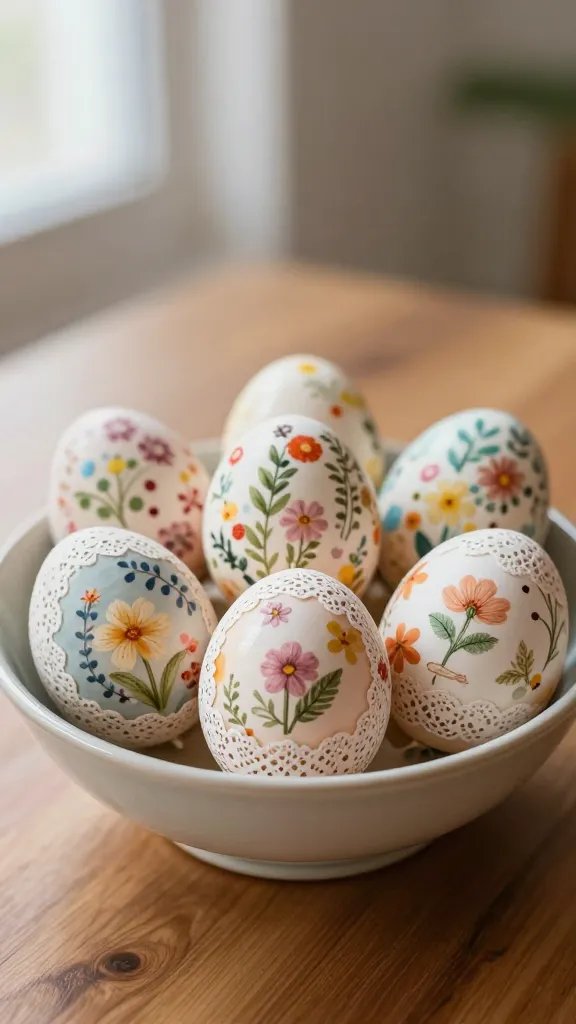
Forget plain dyed eggs! Decoupage is here to elevate your Easter egg game to a whole new level of sophistication. This technique allows you to create stunning, intricate designs using paper napkins or tissue paper, turning simple eggs into miniature works of art.
These aren’t just for hiding; they’re for displaying! Think elegant centerpieces, bowl fillers, or even unique gifts. The beauty is in the delicate patterns and the smooth, sealed finish.
Your Decoupage Toolkit:
- Blown-Out Eggs or Craft Eggs: Blown eggs are delicate but authentic; craft eggs (foam or wooden) are sturdier.
- Paper Napkins or Tissue Paper: Choose patterns with small, delicate designs. Floral, botanical, or even subtle geometric prints work beautifully.
- Mod Podge (Matte or Gloss Finish): Your magical adhesive and sealant.
- Small Foam Brush or Soft Bristle Brush: For applying Mod Podge.
- Scissors: For cutting out your designs.
- Drying Rack or Small Cups: To let the eggs dry without sticking.
Crafting Your Egg-cellent Art:
If using paper napkins, carefully separate the patterned top layer from the plain backing layers. You only want the very thin top layer. Cut or gently tear out the designs you want to use. Smaller pieces are easier to work with, especially on the curved surface of an egg.
Apply a thin layer of Mod Podge to a small section of your egg. Carefully place a piece of your chosen design onto the wet Mod Podge. Gently brush another thin layer of Mod Podge over the top of the paper, smoothing out any wrinkles or air bubbles with your brush. Work in small sections, overlapping your designs slightly as you go.
Once the entire egg is covered, let it dry completely on a drying rack or in a small cup. You can add a second coat of Mod Podge for extra durability and a smoother finish. These decoupage eggs are truly special and make wonderful keepsakes. They add a touch of vintage charm and artistry to your Easter display.
7. Rustic Wooden Crate Display: Farmhouse Chic Vignette
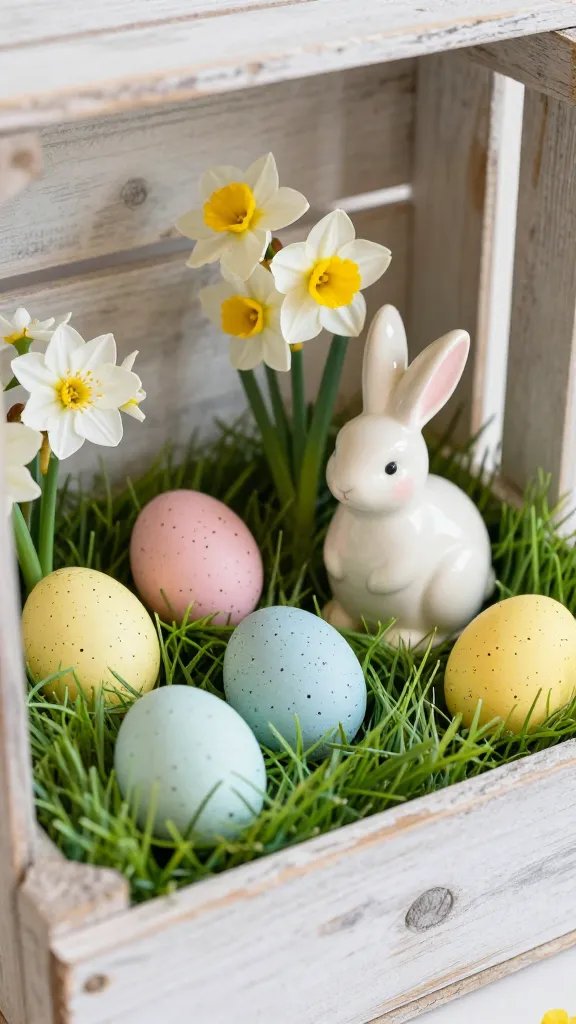
If you’re a fan of that cozy, farmhouse-chic aesthetic, this project is for you. A simple wooden crate can be transformed into a charming Easter vignette, perfect for showcasing all your favorite spring treasures.
It’s an easy way to create a layered, textured display that feels curated and inviting. Plus, it’s super versatile and can be updated seasonally with minimal effort.
Crate Contents Checklist:
- Small Wooden Crate: Unfinished or lightly distressed.
- Faux Grass Mat or Spanish Moss: To line the bottom.
- Decorative Easter Eggs: Various sizes and textures.
- Small Bunny or Chick Figurines: Ceramic, wooden, or fluffy.
- Tiny Bird Nests: Empty or with small faux eggs.
- LED Pillar Candles or Votives: For a soft glow (battery-operated for safety!).
- Spring Flowers or Greenery: Small faux bouquets or sprigs.
Arranging Your Rustic Scene:
Start by lining the bottom of your wooden crate with a faux grass mat or a generous layer of Spanish moss. This creates a soft, natural base for your display. Now, begin arranging your larger items first, like a central bunny figurine or a cluster of larger decorative eggs.
Next, fill in around these focal points with smaller items. Place tiny bird nests in corners, tuck in some LED candles, and scatter decorative eggs throughout. Use varying heights and textures to create visual interest. For instance, place a smaller bunny on top of a stack of moss-covered eggs.
Finally, add small sprigs of faux flowers or greenery to bring in pops of color and freshness. This rustic crate display is perfect for a coffee table, entryway console, or even as a centerpiece on a long dining table. It brings warmth and a touch of country charm to your Easter decor.
8. “Hoppy Easter” Banner: A Festive Statement

Banners are fantastic for adding instant festivity and a clear message to your decor. This “Hoppy Easter” banner is customizable, fun, and perfect for setting a cheerful tone for your celebrations.
Whether it’s hanging over your dessert table or welcoming guests at the door, a well-made banner just screams “party time!” It’s also a great project to involve the whole family, letting everyone contribute to the design.
Banner Building Blocks:
- Cardstock: In spring colors or a neutral tone like kraft paper.
- Letter Stencils or Die-Cut Letters: For “Hoppy Easter.”
- Hole Punch: For stringing the banner.
- Ribbon or Twine: To string the letters.
- Craft Glue or Hot Glue Gun: If you’re attaching pre-cut letters.
- Optional: Glitter, stickers, or small embellishments.
Crafting Your Cheerful Message:
Decide on the size and shape of your banner flags (rectangles, triangles, circles). Cut out your chosen shapes from the cardstock. You’ll need one flag for each letter in “Hoppy Easter.”
Now, for the letters! You can either stencil them onto each flag using paint or markers, or use pre-cut cardstock letters and glue them onto the flags. If you’re feeling extra, add some glitter glue or small spring-themed stickers (think tiny chicks or flowers) to each flag for extra sparkle.
Once your flags are decorated and dry, punch two holes in the top corners of each flag. Thread your ribbon or twine through the holes, arranging the letters to spell “Hoppy Easter.” Leave extra ribbon on each end for hanging. This banner is a simple yet impactful way to declare your Easter enthusiasm. It’s a fantastic backdrop for photos and instantly brightens any room.
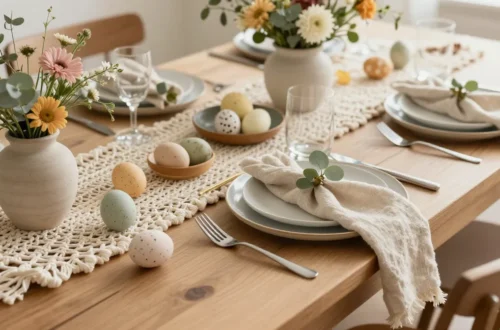
9. Spring-Themed Tiered Tray: The Ultimate Vignette
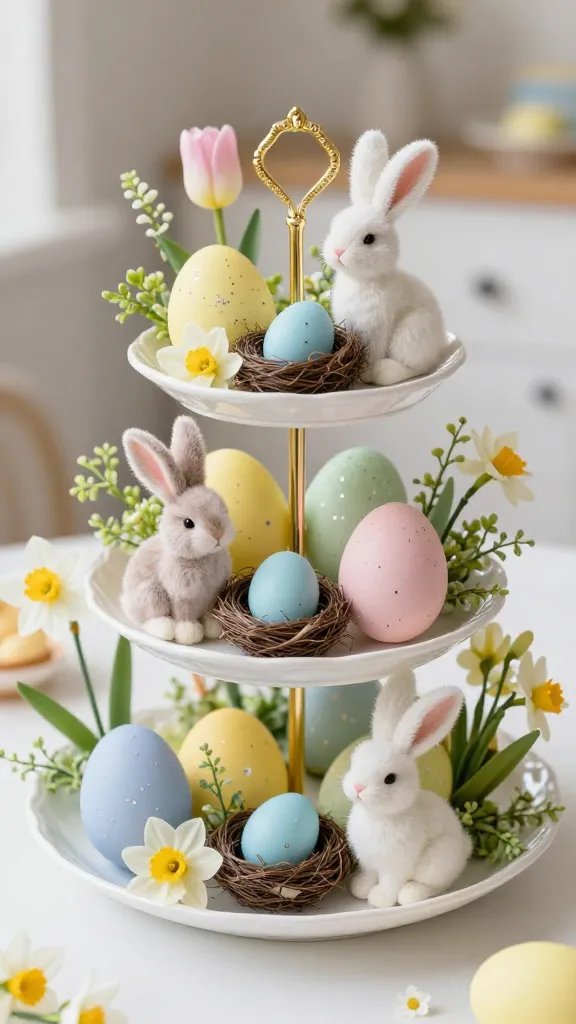
Tiered trays are a decor enthusiast’s dream, offering multiple levels to display a collection of small, themed items. For Easter, they become a charming focal point, allowing you to create a miniature spring wonderland.
This project is all about layering, texture, and creating visual harmony. It’s a fantastic way to gather all your tiny Easter treasures into one gorgeous, Instagram-worthy display.
Tiered Tray Essentials:
- Tiered Tray: Two or three tiers work best.
- Miniature Bunny Figurines: Flocked, ceramic, or wooden.
- Decorative Eggs: Small, pastel, or speckled.
- Faux Nests with Small Eggs: To add a natural element.
- Small Votives or LED Candles: For ambient lighting.
- Mini Faux Flowers or Greenery: Sprigs of lavender, eucalyptus, or tiny blooms.
- Small Signs or Blocks: With spring-themed words (e.g., “Bloom,” “Hello Spring”).
- Filler Material: Spanish moss, crinkle paper, or small pebbles.
Styling Your Spring Showcase:
Begin by placing some filler material on each tier to create a base. This adds texture and helps elevate your items. Start with your larger items on the bottom tier, like a couple of bunnies or a small vase of flowers, to create a stable foundation.
Work your way up, placing medium-sized items on the middle tier and smaller, more delicate items on the top. The key is to vary heights and textures. For example, place a small nest next to a tiny candle, and a decorative egg near a mini sign. Don’t overcrowd any one tier; leave a little breathing room.
Step back frequently to assess your arrangement. Is it balanced? Does it tell a story? Adjust items until you’re happy with the overall look. This tiered tray is a versatile showstopper, perfect for a kitchen island, dining room buffet, or entryway table. It’s an instant dose of curated spring charm.
10. Fabric Scrap Coasters & Placemats: Cozy Table Touches

Give your Easter table a handmade, cozy feel with fabric scrap coasters and placemats. This project is not only practical but also a fantastic way to use up those leftover fabric bits you’ve been hoarding (we all do it!).
Adding handmade textiles instantly warms up a space and shows off your crafty side. Plus, protecting your surfaces from spills and heat is always a win, right?
Scrappy Project Supplies:
- Fabric Scraps: Choose spring-themed patterns or pastel solids. Cotton is ideal.
- Batting or Felt: For padding the coasters/placemats.
- Sewing Machine or Fabric Glue: Depending on your preferred method.
- Scissors and Rotary Cutter (Optional): For precise cutting.
- Iron and Ironing Board: For crisp seams.
- Matching Thread: If sewing.
Crafting Your Table Accents:
For coasters, cut two squares of fabric (e.g., 5×5 inches) and one square of batting (4.5×4.5 inches). For placemats, adjust sizes accordingly (e.g., 18×12 inches for fabric, slightly smaller for batting). Place one fabric square right side up, layer the batting on top, then place the second fabric square right side down.
If sewing, stitch around the edges, leaving a small opening for turning. Trim the corners, turn right side out, push out the corners, and press flat. Stitch the opening closed, either by hand or with a topstitch around the entire perimeter. If using fabric glue, apply a thin layer to secure the layers, then hem the edges with another thin line of glue.
Mix and match patterns for a playful look, or stick to a cohesive color palette for elegance. These fabric scrap coasters and placemats add a delightful, personal touch to your Easter feast and protect your furniture like a boss. They’re practical, pretty, and perfectly springy!
There you have it! Ten fabulous Easter projects to get your creative juices flowing and transform your home into a spring paradise. So grab your supplies, put on your favorite tunes, and get ready to craft some serious joy. Your home (and your guests!) will thank you for it!